A food processor can be an excellent kitchen appliance for...
Read More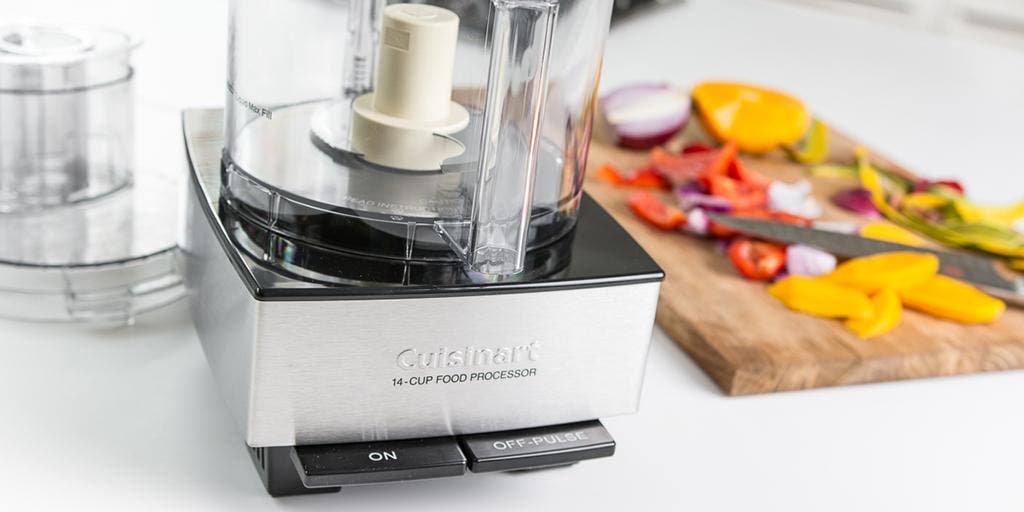
A food processor is an electric kitchen appliance that can quickly and efficiently chop, slice, shred, and puree food. When it comes to making coleslaw, a food processor can be a useful tool for preparing the ingredients. Using a food processor to chop the cabbage, carrots, and other vegetables can save time and effort compared to doing it by hand.
Food processors come with different attachments, including slicing and shredding discs, which can help you achieve the desired texture and consistency for your coleslaw.
Overall, a food processor can be a convenient and time-saving tool for making coleslaw, especially if you need to prepare a large amount of it.
What is the best food processor for coleslaw?
Here are some popular and highly rated food processors for making coleslaw include:
Amazon.com
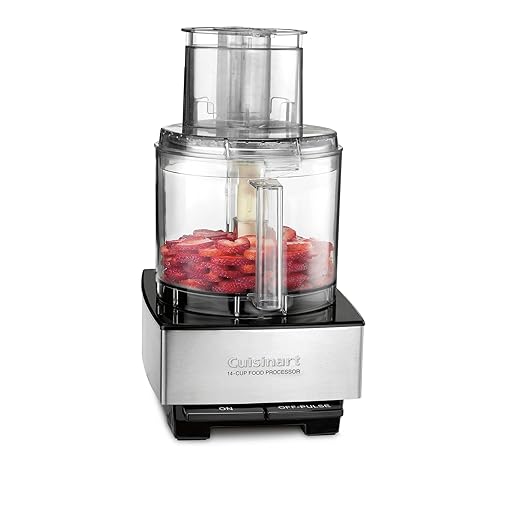
- Cuisinart 14-Cup Food Processor: This food processor has a powerful motor, large capacity, and comes with a shredding disk that can be used to shred cabbage and carrots for coleslaw. Full review here
- KitchenAid 13-Cup Food Processor: This food processor is also powerful, has a large capacity, and comes with a reversible shredding/slicing disc for shredding vegetables.
- Hamilton Beach 12-Cup Food Processor: This food processor has a powerful motor, large capacity, and comes with a stainless steel shredding/slicing disc for processing vegetables. Full review here
Ultimately, the best food processor for coleslaw will depend on your personal preferences, budget and cooking needs.
How to choose the best food processor for coleslaw
When choosing the best food processor for making coleslaw, there are several factors to consider:
- Capacity: Look for a food processor with a large enough capacity to handle the amount of vegetables you plan to shred for your coleslaw. A capacity of at least 9 cups is recommended for making coleslaw for a family or small gathering.
- Power: Choose a food processor with a powerful motor to quickly and easily shred tough vegetables like cabbage and carrots. Look for a motor with at least 600 watts of power.
- Blades: Make sure the food processor comes with a shredding disk or a slicing disk that can be used to shred the cabbage and carrots for coleslaw. Some models come with interchangeable blades that can be used for other food prep tasks as well.
- Ease of use and cleaning: Choose a food processor that is easy to assemble, use, and clean. Consider models that have dishwasher-safe parts or are easy to hand-wash.
- Brand and reviews: Look for a reputable brand with positive reviews from other users. Check out online reviews and ratings to see what other people are saying about the food processor you are considering.
- Price: Food processors can range in price from under $50 to several hundred dollars. Determine your budget and choose a model that offers the features you need at a price you can afford.
By considering these factors and doing some research, you can choose the best food processor for making coleslaw that fits your needs and budget.
Can you shred coleslaw in a food processor?
Yes, you can shred coleslaw in a food processor. In fact, using a food processor to shred the cabbage and other vegetables for coleslaw is a quick and easy way to prepare the ingredients.
To shred coleslaw in a food processor, you’ll need to attach a shredding blade to the food processor. First, remove any tough outer leaves from the cabbage and cut it into wedges small enough to fit through the feeding tube of your food processor. Then, feed the cabbage wedges through the feeding tube while the food processor is turned on. The shredding blade will shred the cabbage into thin, uniform pieces. Repeat the process with any other vegetables you want to include in your coleslaw, such as carrots or onions.
Using a food processor to shred coleslaw ingredients is a great time-saving option for those who need to make large batches of coleslaw or who simply prefer the convenience of using a kitchen appliance to do the work. Just be sure to use caution when handling the sharp blades and follow the instructions that came with your specific food processor model.
Which blade do you use in a food processor to make coleslaw?
To make coleslaw in a food processor, you can use either a shredding blade or a slicing blade, depending on the texture you prefer.
If you prefer your coleslaw to have shredded cabbage and vegetables, use the shredding blade. This will produce thin, uniform shreds that are ideal for coleslaw. To shred the vegetables, you’ll need to feed them through the food processor’s feeding tube while the shredding blade is attached.
If you prefer your coleslaw to have thinly sliced cabbage and vegetables, use the slicing blade. This will produce thin, even slices that can give your coleslaw a slightly different texture than if it were shredded. To slice the vegetables, you’ll need to feed them through the food processor’s feeding tube while the slicing blade is attached.
Overall, both blades can work well for making coleslaw in a food processor, so it’s up to personal preference which one you choose to use. Just be sure to follow the manufacturer’s instructions for your specific food processor to ensure safe and effective use of the blade.
What is the best equipment for making coleslaw?
There are several equipment options that can be used to make coleslaw, and the best one for you will depend on your personal preferences and the amount of coleslaw you need to make. Here are some equipment options for making coleslaw:
- Chef’s knife and cutting board: If you only need to make a small amount of coleslaw, a chef’s knife and cutting board can work well. This method allows you to finely chop or shred the cabbage and other vegetables by hand.
- Mandoline: A mandoline is a kitchen tool with a sharp, adjustable blade that can be used to thinly slice vegetables quickly and easily. This method is ideal for creating uniform slices of cabbage and other vegetables for coleslaw.
- Food processor: A food processor with a shredding or slicing blade attachment is another great option for making coleslaw. It can save time and effort, especially if you need to make a large amount of coleslaw.
- Grater: A box grater or hand-held grater can be used to grate vegetables for coleslaw, although this method can be more time-consuming than using a mandoline or food processor.
Ultimately, the best equipment for making coleslaw depends on your personal preference and the amount of coleslaw you need to make. If you’re making a small batch, a chef’s knife and cutting board or a mandoline might be your best option. If you’re making a larger batch, a food processor or mandoline can be a great time-saving tool.
What size food processor is best for making coleslaw?
The size of the food processor that is best for making coleslaw depends on the amount of coleslaw you need to make. Here are some guidelines to help you choose the best size food processor for your needs:
- Mini food processor: If you only need to make a small batch of coleslaw, a mini food processor with a capacity of 1-2 cups may be sufficient. This size is also convenient for those with limited storage space in their kitchen.
- 7-10 cup food processor: A food processor in the 7-10 cup range is a good size for making coleslaw for a family or small group. It can handle a moderate amount of cabbage and other vegetables, and it’s still compact enough to store easily in most kitchens.
- 11-14 cup food processor: A food processor in the 11-14 cup range is a good choice if you need to make a larger batch of coleslaw. It can handle a larger amount of cabbage and other vegetables, and it may have additional features like a wider feeding tube and more powerful motor.
- 14+ cup food processor: If you frequently make large batches of coleslaw, a food processor with a capacity of 14 cups or more may be the best choice for you. This size is also suitable for commercial or professional use.
Ultimately, the size of the food processor you choose for making coleslaw depends on your personal needs and preferences. Consider how much coleslaw you need to make at a time and how often you plan to use the food processor for other tasks as well.
Should I use a blender or food processor for coleslaw?
While both blenders and food processors can be used to make coleslaw, a food processor is generally the better choice. Here’s why:
- Texture: A food processor allows you to shred or slice cabbage and other vegetables into consistent, uniform pieces, which is ideal for coleslaw. A blender, on the other hand, is better suited for making smoothies or pureeing foods. If you try to use a blender to chop vegetables for coleslaw, you may end up with an uneven texture or even a puree.
- Capacity: Most blenders have a smaller capacity than food processors, which can make it difficult to process larger batches of coleslaw. With a food processor, you can work in larger batches and process more ingredients at once.
- Convenience: Food processors typically have more attachments and features than blenders, which makes them more versatile and convenient for a wider range of kitchen tasks. With a food processor, you can easily switch between slicing, shredding, and chopping attachments to create the perfect coleslaw.
In summary, a food processor is generally the better choice for making coleslaw, as it allows you to achieve the desired texture and process larger batches of ingredients with ease. However, if you don’t have a food processor and need to make coleslaw, a blender can still be used in a pinch. Just be aware that the results may not be as consistent or uniform as they would be with a food processor.
What is pros and cons of using food processor for coleslaw?
Using a food processor for coleslaw has several pros and cons to consider:
Pros:
- Efficiency: A food processor can shred or slice cabbage and other vegetables quickly and efficiently, which is ideal for making coleslaw in large batches.
- Consistency: A food processor can create uniform pieces of cabbage and other vegetables, which ensures a consistent texture and appearance in your coleslaw.
- Versatility: A food processor can be used for a variety of kitchen tasks, so it’s a useful tool to have in your kitchen beyond just making coleslaw.
Cons:
- Cost: Food processors can be expensive, especially if you opt for a larger, high-quality model with multiple attachments.
- Space: Food processors can be bulky and take up valuable counter or storage space in your kitchen.
- Clean-up: Cleaning a food processor can be time-consuming and may require disassembling multiple parts to ensure a thorough clean.
- Over-processing: If you’re not careful, a food processor can over-process your coleslaw ingredients, resulting in a mushy or unappetizing texture.
In summary, using a food processor for coleslaw can be an efficient and consistent way to prepare this dish, but it does come with some drawbacks such as cost, space, and clean-up. Ultimately, the decision to use a food processor or another method for making coleslaw depends on your personal preferences and needs in the kitchen.
How to use food processor for coleslaw
Here is a step-by-step guide on how to use a food processor to make coleslaw:
Ingredients:
- 1 small head of cabbage, cored and shredded
- 1-2 carrots, peeled and shredded
- 1/2 cup mayonnaise
- 2 tablespoons apple cider vinegar
- 1 tablespoon honey
- 1/2 teaspoon salt
- 1/4 teaspoon black pepper
Instructions:
- Set up your food processor with the shredding blade or attachment.
- Cut the cabbage into quarters and remove the core. Cut each quarter into smaller pieces that will fit into the feeding tube of your food processor.
- Add the cabbage to the food processor and pulse until it is shredded into small, even pieces. Depending on the size of your food processor, you may need to work in batches.
- Remove the shredded cabbage from the food processor and transfer it to a large mixing bowl.
- Repeat the shredding process with the carrots, adding them to the mixing bowl with the cabbage.
- In a small bowl, whisk together the mayonnaise, apple cider vinegar, honey, salt, and black pepper.
- Pour the dressing over the cabbage and carrots, and mix everything together until the vegetables are coated evenly with the dressing.
- Taste the coleslaw and adjust the seasoning as needed. If it’s too dry, add more dressing. If it’s too tangy, add a little more honey.
- Chill the coleslaw in the refrigerator for at least 30 minutes before serving to allow the flavors to meld together.
That’s it! Using a food processor can make preparing the cabbage and carrots for coleslaw a quick and easy process, while still ensuring a consistent and uniform texture.
How do you shred carrots for coleslaw in a food processor?
Here’s how you can shred carrots for coleslaw in a food processor:
- Wash and peel the carrots, if necessary.
- Cut the carrots into small pieces that will fit into the feeding tube of your food processor.
- Insert the shredding blade or attachment into your food processor.
- Turn on the food processor and feed the carrot pieces into the feeding tube.
- Use the food pusher to guide the carrots through the shredding blade.
- Once all the carrots have been shredded, turn off the food processor and remove the shredding blade or attachment.
- Remove the shredded carrots from the food processor and mix them with the shredded cabbage in a large mixing bowl.
That’s it! Using a food processor to shred carrots for coleslaw is a quick and easy way to prepare this ingredient, and it ensures a consistent texture in your coleslaw.
How do you make coleslaw not watery?
Coleslaw can sometimes become watery, which can dilute the flavor and make the dish less enjoyable. Here are some tips to make coleslaw less watery:
- Salt the cabbage: Sprinkling salt on the shredded cabbage and letting it sit for about 30 minutes can draw out excess moisture. After 30 minutes, rinse the cabbage thoroughly with cold water and pat it dry with a clean kitchen towel.
- Don’t overdress the coleslaw: Adding too much dressing can make the coleslaw too wet. Start with a small amount of dressing and add more as needed. You can always add more dressing later, but you can’t take it away once it’s been added.
- Dress the coleslaw just before serving: If you dress the coleslaw too far in advance, the dressing can cause the cabbage and other vegetables to release more moisture. It’s best to wait until just before serving to add the dressing.
- Use a thicker dressing: Thicker dressings, like those made with sour cream or Greek yogurt, can help to prevent excess moisture from being released.
- Store coleslaw correctly: If you have leftovers, store the coleslaw in an airtight container in the refrigerator. Drain any excess liquid that accumulates at the bottom of the container before serving.
By following these tips, you can help to prevent coleslaw from becoming too watery and ensure that it stays flavorful and enjoyable.
How do you thicken coleslaw?
If your coleslaw is too thin or watery and you want to thicken it up, here are a few ways to do it:
- Add more cabbage: If you have more cabbage available, you can add some to your coleslaw to increase its volume and thicken it up.
- Add more carrots: Carrots are another ingredient that can help to thicken coleslaw. You can add more shredded carrots to your coleslaw to help bulk it up.
- Use a thicker dressing: If your dressing is too thin, you can add more mayonnaise, sour cream, Greek yogurt, or another thickening agent to help thicken it up.
- Add some cornstarch: Mix some cornstarch with water to create a slurry, then add it to your coleslaw dressing. Heat the dressing in a saucepan over low heat, stirring constantly, until it thickens up.
- Use a creamy base: Creamy bases like buttermilk, yogurt, or heavy cream can add thickness and richness to your coleslaw dressing.
By using one or more of these methods, you can thicken up your coleslaw to your desired consistency. Keep in mind that it’s best to add thickening agents slowly and gradually to avoid making your coleslaw too thick or lumpy.
Do you wash cabbage before making coleslaw?
Yes, it’s a good idea to wash cabbage before making coleslaw to remove any dirt or debris that may be present. Here’s how you can wash cabbage before making coleslaw:
- Remove any damaged or wilted outer leaves from the cabbage.
- Rinse the cabbage under cold running water.
- Use your hands to separate the leaves and rinse them individually, making sure to remove any dirt or debris.
- Cut the cabbage in half and remove the core.
- Shred the cabbage using a food processor, mandoline, or sharp knife.
- Rinse the shredded cabbage one more time under cold running water and drain well.
By washing the cabbage before making coleslaw, you can ensure that it’s clean and free from any unwanted debris, which will help to make your coleslaw taste better and be more enjoyable.
How do you preserve homemade coleslaw?
If you want to preserve homemade coleslaw, it’s important to store it properly to prevent it from spoiling. Here are a few ways to preserve homemade coleslaw:
- Refrigerate: Homemade coleslaw can be stored in an airtight container in the refrigerator for up to 3-5 days. It’s best to keep the coleslaw chilled at all times and avoid leaving it at room temperature for extended periods.
- Freeze: Coleslaw can be frozen, but it’s important to note that the texture may change once it’s thawed. To freeze coleslaw, place it in an airtight container and freeze for up to 2-3 months. Thaw the coleslaw in the refrigerator before serving.
- Use vinegar: If you want to preserve coleslaw for a longer period, you can add vinegar to the dressing. The acid in vinegar helps to preserve the vegetables and prevent spoilage. You can also add salt and sugar to the dressing to help preserve the coleslaw.
- Store separately: If you’re making coleslaw with different ingredients, you may want to store them separately and combine them just before serving. This can help to prevent the coleslaw from becoming soggy or watery.
By following these tips, you can preserve homemade coleslaw and enjoy it for several days or even weeks. However, it’s always best to consume fresh coleslaw as soon as possible for the best taste and texture.
How to clean food processor for making coleslaw
Cleaning a food processor after making coleslaw is important to prevent bacteria growth and ensure that your food processor is ready to use for your next recipe. Here’s how you can clean your food processor after making coleslaw:
- Unplug the food processor and disassemble it by removing the bowl, blade, and lid.
- Remove any large pieces of food or debris from the bowl and blade.
- Rinse the bowl and blade under warm running water to remove any remaining food particles.
- Add a few drops of dish soap to the bowl and blade and fill the bowl with warm water.
- Use a sponge or scrub brush to clean the bowl and blade, paying special attention to the blade and any crevices.
- Rinse the bowl and blade thoroughly under warm running water to remove all soap residue.
- Allow the bowl and blade to air dry or use a clean towel to dry them thoroughly before reassembling the food processor.
It’s important to clean your food processor after every use to prevent food particles and bacteria from accumulating and potentially causing foodborne illness. By following these simple steps, you can ensure that your food processor is clean and ready to use for your next recipe.
How to maintain food processor for making coleslaw properly
Maintaining your food processor properly is important to ensure its longevity and to avoid contamination of your food. Here are some tips on how to maintain your food processor for making coleslaw properly:
- Clean the food processor after each use: After using your food processor to make coleslaw or any other food, make sure to clean it thoroughly as described in the previous answer.
- Check the blades regularly: Inspect the blades for any signs of wear or damage. If they are dull or chipped, it may be time to replace them to ensure that they are working properly.
- Store the food processor properly: Store the food processor in a dry and clean place, away from heat and moisture. Keep it in a safe place where it won’t get damaged, and make sure that the power cord is stored neatly.
- Use the right attachments: Make sure to use the right attachment for the job at hand. Don’t use a blade or attachment that is too small or too large for the food you are processing.
- Follow the manufacturer’s instructions: Always follow the manufacturer’s instructions for your specific food processor. They may have specific recommendations for maintenance and cleaning that are different from other models.
By following these tips, you can maintain your food processor properly and ensure that it will last for many years. Proper maintenance of your food processor will not only help to keep it in good condition but will also ensure that your coleslaw and other food preparations are safe and hygienic.
Troubleshooting about food processor for coleslaw
Here are some common troubleshooting tips for using a food processor to make coleslaw:
- Unevenly chopped vegetables: If your vegetables are not evenly chopped, it could be because you are overfilling the food processor. Try processing smaller batches of vegetables at a time.
- Watery coleslaw: If your coleslaw is watery, it could be because you are not draining the cabbage and other vegetables enough before adding the dressing. Make sure to pat the vegetables dry with a paper towel or a clean kitchen towel before mixing in the dressing.
- Overheating: If your food processor overheats, it may be because you are overworking the motor by processing too much food at once. Try processing smaller batches of food at a time and give the motor a chance to cool down between batches.
- Difficulty removing food from blade: If you are having trouble removing food from the blade, try scraping it with a spatula or a spoon. Be careful not to cut yourself on the blade.
- Food processor not working: If your food processor is not working, check to make sure that it is properly assembled and plugged in. Make sure that the power cord is not damaged and that the electrical outlet is working.
If you encounter any other problems while using your food processor to make coleslaw, consult the manufacturer’s manual or contact their customer support for additional assistance.
Conclusion
A food processor is a great tool to use for making coleslaw. It can make the preparation process quick and easy by shredding the cabbage and other vegetables in just a few seconds. The food processor can also help you achieve a consistent texture and size for your vegetables.
When using a food processor for making coleslaw, it is important to choose the right size of the appliance and to use the appropriate blades and attachments. It is also crucial to clean the food processor thoroughly after each use to avoid contamination.
To ensure that your coleslaw turns out great, make sure to follow the recipe carefully and to properly drain the vegetables before mixing in the dressing. By following these tips and troubleshooting advice, you can make delicious and healthy coleslaw using your food processor.
Related Posts


How To Shred Cabbage In Food Processor
Cabbage is a leafy green or purple vegetable that is...
Read More Post Views: 603
Why Trust Us
You will find what you are looking for at Jody's Bakery. From classic to luxury brands, you'll find both. We will help you to select appliances that fit your needs, budget and lifestyle. Whether you want to stop by to learn more — or plan to make a major purchase — we’ll treat you like family and assist you every step of the way. Shop with us today to receive friendly and experienced help along the way.