
The Babycakes CP-12 Cake Pop Maker is a compact and...
Read More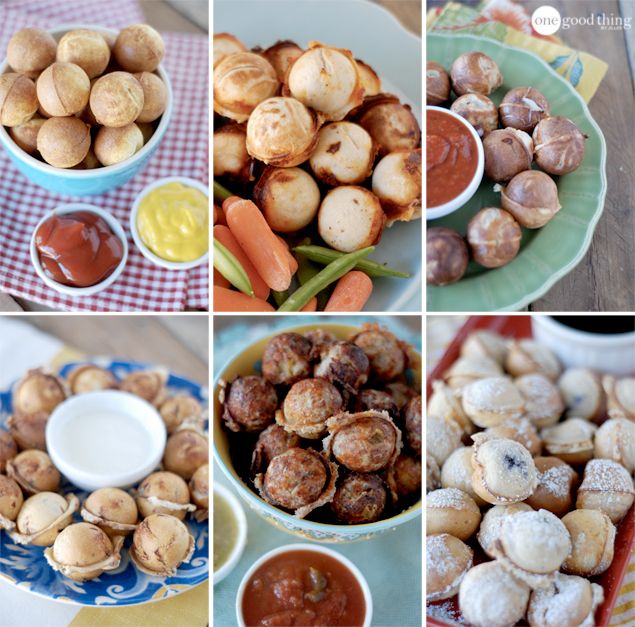
Cake pop maker recipes are a collection of delightful and creative treats that can be made using a cake pop maker. These recipes offer a twist on traditional cake recipes, transforming them into bite-sized, portable, and visually appealing cake pops.
Cake pop maker recipes typically involve preparing a cake batter, pouring it into the cavities of the cake pop maker, and baking the batter into round or shaped cake balls. Once the cake pops are cooked and cooled, they can be decorated with various frostings, glazes, chocolates, sprinkles, or other toppings to add flavor and visual appeal.
The versatility of cake pop maker recipes allows for endless flavor combinations and customization options. From classic flavors like chocolate and vanilla to more adventurous choices like red velvet, lemon, or even fruity variations, there’s a recipe to suit every taste preference.
In addition to traditional cake flavors, cake pop maker recipes often include unique variations such as brownie pops, cookie dough pops, or even savory options like cheese-filled cake pops. These recipes provide an opportunity to explore different flavors and experiment with new and exciting taste combinations.
Cake pop maker recipes also offer flexibility in terms of decorating and theme options. They can be transformed into playful characters, elegant designs, or themed creations for special occasions such as birthdays, weddings, holidays, or other festive events.
Whether you’re a beginner baker or an experienced pastry enthusiast, cake pop maker recipes provide a fun and creative outlet to showcase your baking skills. They are perfect for parties, gatherings, or as delightful homemade gifts.
With a variety of flavors, decorations, and themes to choose from, cake pop maker recipes allow you to create delectable and eye-catching treats that are sure to impress and satisfy any sweet tooth.
What is cake pop made of?
A cake pop is typically made of crumbled cake mixed with frosting or another binder, dipped in candy coating, and decorated. Here’s a breakdown of the main components:
- Cake: The cake pop starts with a baked cake, which can be made from scratch or using a cake mix. Common flavors include vanilla, chocolate, red velvet, or any other desired flavor.
- Frosting or Binder: The crumbled cake is combined with frosting or another binder to create a mixture that holds its shape. Frosting acts as the adhesive that binds the cake crumbs together. Cream cheese frosting, buttercream frosting, or ganache are commonly used binders.
- Coating: The cake pop is dipped in candy melts, chocolate, or candy coating to create a smooth outer shell. This coating not only adds a delicious flavor but also provides a protective layer to keep the cake pop moist.
- Decorations: After dipping, the cake pop can be decorated with various toppings, such as sprinkles, colored sugar, edible glitter, or drizzled chocolate. This adds visual appeal and enhances the overall taste.
- Cake Pop Stick: A cake pop stick or lollipop stick is inserted into the cake pop for easy handling and serving. It acts as a handle and allows the cake pop to be displayed upright.
The combination of these elements creates a sweet and bite-sized treat that resembles a lollipop. Cake pops are versatile and can be customized with different cake flavors, frostings, coatings, and decorations to suit individual preferences and occasions.
What else can I use a cake pop maker for?
While a cake pop maker is primarily designed for making cake pops, there are several other creative and delicious treats you can make using this versatile appliance. Here are a few ideas:
- Donut Holes: Use the cake pop maker to create perfectly round and golden-brown donut holes. Simply prepare a donut batter and fill the wells of the cake pop maker. Cook until they are cooked through and slightly crispy on the outside. Dust them with powdered sugar or glaze them for added sweetness.
- Pancake Bites: Whip up a batch of pancake batter and pour it into the cake pop maker. Cook until golden and fluffy pancake bites are formed. Serve them with maple syrup, fruit, or a dusting of powdered sugar.
- Cheese Puffs: Make savory cheese puffs by preparing a dough made with cheese, flour, eggs, and spices. Fill the wells of the cake pop maker with the dough and cook until they are puffed and golden. These make great bite-sized appetizers or snacks.
- Meatballs: Create perfectly portioned meatballs using the cake pop maker. Prepare your favorite meatball mixture, shape them into small balls, and cook them in the cake pop maker until they are cooked through. Serve with sauce as a fun twist on traditional meatballs.
- Savory Puffs: Prepare a savory batter with ingredients like cornmeal, cheese, herbs, and vegetables. Fill the cake pop maker with the batter and cook until they are golden and crispy. These savory puffs can be enjoyed as a snack or served as a side dish.
Remember to adjust the cooking time and temperature based on the specific recipe and ingredients you’re using. With a little creativity, you can experiment with different batters and fillings to make a variety of tasty treats using your cake pop maker.
How do you make a cake pop?
To make a basic cake pop, follow these steps:
- Bake a Cake: Start by baking a cake of your choice. You can use a cake mix or make a homemade cake. Ensure that the cake is fully cooked and let it cool completely.
- Crumble the Cake: Once the cake is cooled, crumble it into fine crumbs using your hands or a food processor. Make sure there are no large chunks left.
- Add Binder: Add a binder such as frosting or another sticky ingredient to the cake crumbs. Start by adding a small amount and gradually mix it in until the mixture holds its shape when pressed together. The amount of binder needed may vary depending on the cake’s moisture content and the desired consistency of the mixture.
- Shape the Cake Balls: Take small portions of the cake mixture and roll them into evenly-sized balls. Place the balls on a parchment-lined baking sheet or a plate. Repeat until all the mixture is used.
- Chill the Cake Balls: Once you have shaped all the cake balls, place them in the refrigerator for about 15-30 minutes to firm up. This step will make them easier to handle and prevent them from falling apart during the dipping process.
- Prepare the Coating: Melt the candy melts, chocolate, or candy coating according to the package instructions. Stir until smooth and fully melted. You can also add a small amount of vegetable shortening or oil to thin the coating for smoother dipping consistency, if desired.
- Dip the Cake Pops: Take a cake pop stick and dip it into the melted coating, then insert it into a cake ball, about halfway through. Holding the stick, dip the entire cake ball into the coating, allowing any excess to drip off. You can gently tap the stick against the edge of the bowl to remove excess coating.
- Decorate the Cake Pops: Before the coating sets, you can decorate the cake pops with sprinkles, colored sugar, or other decorations of your choice. Place the decorated cake pops in a Styrofoam block or a cake pop stand to allow them to dry and set completely.
- Let Them Set: Allow the cake pops to dry and set completely. You can leave them at room temperature or place them in the refrigerator for faster setting.
Once the coating is fully set, your cake pops are ready to be enjoyed! You can serve them as is or display them in a decorative arrangement for special occasions.
Why should you buy cake pop maker?
There are several reasons why you might consider buying a cake pop maker:
- Convenience: A cake pop maker offers a convenient and efficient way to make cake pops. It simplifies the process by providing evenly shaped and cooked cake balls without the need for traditional baking and shaping methods.
- Time-saving: Making cake pops can be time-consuming when using conventional methods. With a cake pop maker, you can bake multiple cake pops at once, reducing the overall preparation and cooking time.
- Versatility: While cake pops are the primary treat made with a cake pop maker, many models can also be used to make other delicious treats like donut holes, pancake bites, savory puffs, and more. This adds versatility to the appliance and allows you to experiment with different recipes.
- Consistency: The cake pop maker ensures consistent results every time. The even heat distribution and cooking process help achieve uniform cake pops with a consistent texture and doneness.
- Fun and Creative: Making cake pops can be a fun and creative activity for individuals, families, or parties. It allows you to explore different flavors, decorations, and designs, making it an enjoyable experience for both kids and adults.
- Professional Presentation: Cake pops made with a cake pop maker often have a polished and professional appearance. The perfectly round shape and smooth texture can impress guests at parties or events.
- Cost-effective: Making cake pops at home with a cake pop maker can be more cost-effective than buying them from a bakery or store. You have control over the ingredients used, allowing you to customize flavors and potentially save money in the long run.
Ultimately, whether to buy a cake pop maker depends on your personal preferences, baking habits, and how frequently you plan to make cake pops or other treats. If you enjoy making cake pops, want to save time, and value the convenience and consistency provided by a dedicated appliance, investing in a cake pop maker can be a worthwhile choice.
How do you use a pop cake maker?
To use a cake pop maker, follow these general steps:
- Preheat the Cake Pop Maker: Plug in the cake pop maker and preheat it according to the manufacturer’s instructions. Typically, there will be an indicator light that will turn on when the appliance is heated and ready for use.
- Prepare the Cake Pop Batter: While the cake pop maker is preheating, prepare the cake pop batter according to your chosen recipe. This usually involves mixing together ingredients such as cake mix, eggs, oil, and water until well combined. Follow the recipe instructions for specific measurements and mixing techniques.
- Grease the Cavities: Lightly grease the baking cavities of the cake pop maker with cooking spray or a small amount of oil. This will help prevent the cake pops from sticking to the surface.
- Fill the Cavities: Using a spoon or a piping bag, carefully fill each cavity of the cake pop maker with the prepared batter. Fill the cavities to the recommended level or as instructed by the manufacturer. Be careful not to overfill as the batter will expand during baking.
- Close the Lid and Bake: Close the lid of the cake pop maker, securing it in place. The baking process typically takes a few minutes, but the exact baking time will depend on the specific cake pop maker and the recipe used. Follow the manufacturer’s instructions for the recommended baking time.
- Check for Doneness: After the suggested baking time has passed, carefully open the lid and check the cake pops for doneness. They should be firm to the touch and have a golden-brown color. If they need additional baking time, close the lid and continue baking for a little longer.
- Remove the Cake Pops: Once the cake pops are fully baked, use a fork or the provided fork tool to gently lift them out of the cavities. Place them on a wire rack or a plate to cool completely before decorating.
- Decorate the Cake Pops: Once the cake pops have cooled, you can decorate them according to your preference. Dip them in melted chocolate, coat them with frosting or glaze, and add sprinkles or other decorations. Insert cake pop sticks if desired.
- Serve and Enjoy: Once decorated, the cake pops are ready to be served and enjoyed. They can be displayed on a cake pop stand or placed in individual cake pop wrappers for a fun and visually appealing presentation.
Remember to always follow the specific instructions provided by the manufacturer of your cake pop maker, as the usage and baking times may vary.
What ingredients are used in cake pop maker?
To make cake pops using a cake pop maker, you will typically need the following ingredients:
- Cake Mix or Homemade Cake Batter: You can use a pre-packaged cake mix or prepare a homemade cake batter. The flavor of the cake is up to your preference, such as vanilla, chocolate, red velvet, or any other flavor you like.
- Frosting or Binder: A frosting or binder is used to bind the crumbled cake together and create the cake pop mixture. You can use store-bought frosting or make your own. Cream cheese frosting, buttercream frosting, or ganache are commonly used options.
- Coating: To coat the cake pops, you will need candy melts, chocolate, or candy coating. These are available in various colors and flavors. You can choose based on your preference and the desired appearance of the cake pops.
- Decorations: Optional decorations include sprinkles, colored sugar, edible glitter, or other decorative items to personalize and enhance the appearance of the cake pops.
- Cake Pop Sticks: Cake pop sticks or lollipop sticks are used to insert into the cake pops for serving and holding them.
Additionally, you may need cooking spray or melted butter to grease the cake pop maker, and you might want to have a stand or Styrofoam block to hold the cake pops while they dry.
It’s important to read and follow the specific recipe or instructions provided with your cake pop maker, as the ingredients and quantities may vary based on the specific model or recipe you are using.
How to make perfectly smooth cake pops?
To achieve perfectly smooth cake pops, follow these tips and techniques:
- Ensure Proper Cake Texture: Start with a cake that has a fine and tender crumb. Avoid overbaking the cake, as it can result in a drier texture that may be more difficult to achieve a smooth consistency.
- Crumble the Cake Thoroughly: Once the cake is baked and cooled, crumble it into fine crumbs using your hands or a food processor. Make sure there are no large lumps or chunks of cake remaining.
- Add Binding Agent: To help bind the cake crumbs together and achieve a smooth consistency, mix in a frosting or binder of your choice. Add the frosting gradually, starting with a smaller amount and adding more as needed, until the mixture holds together well but is not too sticky. The frosting acts as the glue that holds the cake crumbs together.
- Mix Thoroughly: Use your hands or a spoon to mix the cake crumbs and frosting together until they are well combined. Make sure there are no dry crumbs left and the mixture has a uniform texture.
- Roll Uniformly Sized Balls: Take small portions of the mixture and roll them between your palms to form even-sized balls. This step is crucial to ensure consistent cooking and a smooth final appearance.
- Chill the Cake Balls: Place the rolled cake balls on a baking sheet lined with parchment paper and refrigerate them for at least 15-30 minutes or until they firm up. Chilling helps the cake balls hold their shape and makes them easier to handle during the dipping process.
- Melt the Coating: Use high-quality melting chocolate, candy melts, or candy coating designed for cake pops. Melt the coating according to the package instructions, ensuring it is smooth and fluid for easy dipping.
- Dip Smoothly: Dip each chilled cake pop into the melted coating, making sure to cover it completely. Gently tap off any excess coating by tapping your wrist or lightly tapping the cake pop against the edge of the bowl. Avoid stirring the cake pop in the coating, as this can cause the coating to become uneven.
- Let Excess Coating Drip: After tapping off the excess coating, allow the cake pop to drip for a few seconds to ensure a smooth finish and prevent pooling.
- Insert and Dry: Insert the cake pop stick into a Styrofoam block or cake pop stand, ensuring it stands upright. Allow the cake pops to dry completely before decorating or packaging. This helps maintain their smooth appearance and prevents smudging.
By following these steps and practicing the technique, you can achieve perfectly smooth cake pops that are visually appealing and enjoyable to eat. Remember, practice makes perfect, so don’t be discouraged if your first attempts aren’t flawless. Enjoy the process and have fun decorating your cake pops!
How do you make cake pops not leak?
To prevent cake pops from leaking or cracking, follow these tips:
- Use the Right Cake-to-Frosting Ratio: Ensure that the cake-to-frosting ratio is appropriate when mixing the cake crumbs with the frosting. Adding too much frosting can make the mixture too moist and prone to leakage. Start with a smaller amount of frosting and gradually add more as needed until the mixture holds together well without being too sticky.
- Chill the Cake Pop Mixture: After shaping the cake pop mixture into balls, place them in the refrigerator for at least 15-30 minutes to firm up. Chilling helps the mixture set and holds its shape better, reducing the chances of leakage during the dipping process.
- Don’t Overfill the Cavities: If you’re using a cake pop maker, be careful not to overfill the cavities with the cake mixture. Overfilling can cause the batter to spill over the edges and result in unevenly shaped cake pops. Fill the cavities up to the recommended level or as per the instructions provided with the cake pop maker.
- Seal the Cake Pops Properly: When inserting the sticks into the cake pops, make sure they are inserted deep enough to create a secure seal. The stick should be inserted into the cake pop, almost reaching the center, to hold it firmly in place. Gently twist the stick while inserting it to help secure it further.
- Properly Melt the Coating: Ensure that the candy melts, chocolate, or candy coating used for dipping the cake pops are melted to the correct consistency. Overheating the coating can make it too thin, causing it to seep into the cake pops and potentially lead to leakage. Follow the melting instructions on the packaging and stir the coating until it is smooth and fluid.
- Tap Off Excess Coating: After dipping the cake pops into the coating, gently tap off any excess by tapping your wrist or lightly tapping the stick against the edge of the bowl. This helps remove any excess coating and creates a smooth finish without excessive thickness that can contribute to leakage.
- Allow Proper Drying: After dipping, insert the cake pops into a Styrofoam block or cake pop stand to allow them to dry completely. Allowing the cake pops to dry upright prevents any excess coating from pooling around the base, which can lead to leakage or cracking.
By following these tips and techniques, you can minimize the chances of cake pops leaking or cracking, resulting in beautifully coated and intact treats. Remember, practice and patience are key to mastering the art of making cake pops.
Should I put oil in my cake pops?
It is not necessary to add oil directly to the cake pop mixture. The cake pop mixture typically consists of crumbled cake combined with frosting or another binder to help hold the mixture together. The frosting already provides moisture and helps bind the crumbs together.
Adding oil to the cake pop mixture may make it too moist and difficult to shape into balls. It can also affect the texture and flavor of the cake pops. The goal is to have a mixture that is moist enough to hold its shape but not overly wet.
However, when it comes to coating the cake pops, you may need to add a small amount of vegetable oil or shortening to the melted chocolate, candy melts, or candy coating used for dipping. This helps thin out the coating, making it easier to achieve a smooth and thin layer on the cake pops. Follow the specific instructions on the coating package for any recommended additions of oil or shortening.
Overall, for the cake pop mixture itself, there is no need to add oil. The combination of crumbled cake and frosting or another binder should provide sufficient moisture and cohesiveness to create delicious and well-formed cake pops.
What is the trick to dipping cake pops?
Dipping cake pops can be a bit tricky, but with a few tips and tricks, you can achieve smooth and beautifully coated cake pops. Here are some tricks to help you master the art of dipping cake pops:
- Chill the Cake Pops: After shaping the cake pops and inserting the sticks, place them in the refrigerator for about 15-30 minutes to firm up. Chilled cake pops hold their shape better and are less likely to crumble when dipped.
- Melt the Coating: Use high-quality melting chocolate, candy melts, or candy coating specifically designed for dipping. Follow the package instructions for melting the coating properly. Use a microwave, double boiler, or melting pot to achieve a smooth and thin consistency.
- Dip at the Right Temperature: Make sure the coating is at the right temperature for dipping. It should be fluid and thin enough to coat the cake pops smoothly but not too hot that it will melt the cake pops. Stir the coating occasionally to maintain the desired consistency.
- Tap off Excess Coating: Once you dip a cake pop into the coating, gently tap off any excess by lightly tapping your wrist or tapping the stick against the edge of the bowl. This helps to remove excess coating and create a smooth finish.
- Rotate and Twirl: As you tap off the excess coating, rotate and twirl the cake pop slowly to allow the excess coating to drip off evenly. This helps to prevent pooling and create a more uniform coating.
- Use a Styrofoam Block or Cake Pop Stand: After dipping, insert the cake pops into a Styrofoam block or a cake pop stand to allow them to dry upright. This helps the excess coating to drip off evenly and prevents any smudging or misshaping.
- Decorate Immediately: If you plan to add sprinkles, drizzles, or other decorations, do it while the coating is still wet. Once the coating sets, it becomes harder for the decorations to adhere properly.
- Practice and Patience: Dipping cake pops can be a skill that improves with practice. Don’t get discouraged if your first attempts don’t turn out perfectly. With patience and practice, you’ll develop a technique that works best for you.
Remember, the key is to work with a smooth and thin coating, tap off excess, and allow the cake pops to dry properly. Experiment with different techniques and have fun exploring various decorating options to create beautiful and delicious cake pops.
What not to do when making cake pops?
When making cake pops, there are a few common pitfalls to avoid to ensure the best results. Here are some things not to do when making cake pops:
- Overmixing the Batter: Be careful not to overmix the cake batter. Overmixing can lead to a denser texture and result in tough or dry cake pops. Mix the batter just until the ingredients are combined to maintain a light and tender texture.
- Overfilling the Cavities: When using a cake pop maker or shaping the cake pops by hand, avoid overfilling the cavities or forming excessively large cake balls. Overfilled cavities can cause the batter to spill over and make it difficult to close the lid properly. Large cake balls may not cook evenly or hold their shape during the baking process.
- Using a Wet or Warm Cake Pop Maker: Always ensure that your cake pop maker is fully dry and properly preheated before adding the batter. Moisture or residual heat can affect the cooking process and result in unevenly baked cake pops or sticking.
- Not Chilling the Cake Pops: Skipping the step of chilling the cake pops before dipping can lead to cake pops that are too soft and prone to crumbling or falling off the sticks. Chilling helps the cake pops firm up, making them easier to handle and dip without losing their shape.
- Not Tapping Off Excess Coating: Failing to tap off excess coating after dipping the cake pops can result in thick and clumpy coatings that overpower the cake inside. It can also lead to uneven drying and pooling of the coating, affecting the appearance of the cake pops.
- Applying Decorations Too Late: If you plan to add sprinkles, drizzles, or other decorations, apply them immediately after dipping while the coating is still wet. Waiting too long can cause the coating to set and the decorations may not adhere properly.
- Rushing the Drying Process: Allow sufficient time for the cake pops to dry completely before serving or packaging. Rushing the drying process can cause the coating to crack, smudge, or lose its smooth finish. Patience is key to achieving professional-looking cake pops.
By avoiding these common mistakes, you can increase your chances of making perfectly shaped, delicious, and visually appealing cake pops. Remember, practice makes perfect, so don’t be discouraged if your first attempts don’t turn out exactly as you envisioned. Enjoy the process and have fun experimenting with different flavors, decorations, and designs.
How long do cake pops stay fresh?
The freshness of cake pops can vary depending on various factors such as the ingredients used, storage conditions, and the specific recipe. In general, properly stored cake pops can stay fresh for about 2 to 3 days at room temperature.
To maximize the shelf life of cake pops, it’s important to store them in an airtight container or wrap them tightly with plastic wrap to prevent air exposure. This helps to maintain their moisture and prevent them from drying out.
If you want to extend the freshness of cake pops, you can store them in the refrigerator. Refrigerated cake pops can typically stay fresh for up to 5 to 7 days. However, keep in mind that refrigeration can sometimes affect the texture and make the cake pops slightly denser.
For longer-term storage, cake pops can be frozen. Wrap each cake pop individually in plastic wrap, place them in an airtight container or freezer bag, and freeze for up to 2 to 3 months. Thaw the cake pops in the refrigerator overnight before serving.
It’s worth noting that the freshness and quality of cake pops may start to decline over time. The texture may become drier, and the flavors may not be as vibrant. Therefore, it’s best to consume them within the recommended freshness period for the best taste and experience.
It’s always a good idea to use your judgment and inspect the cake pops visually and by taste before consuming them, especially if they have been stored for an extended period. If you notice any signs of spoilage, such as mold growth or an off odor, it’s best to discard them to ensure food safety.
What is the best candy coating for cake pops?
There are several options for candy coating when it comes to making cake pops. The best choice depends on personal preference and the specific desired outcome. Here are a few popular options for candy coating:
- Candy Melts/Wafers: Candy melts or candy wafers are often used for coating cake pops. They are available in a wide range of colors and flavors, making them versatile for creating various designs. Candy melts are easy to work with, melt smoothly, and set quickly. They are also readily available in many craft and baking stores.
- Melting Chocolate: High-quality melting chocolate, such as couverture or confectionery coating, can be used for coating cake pops. These chocolates have a higher cocoa butter content, which gives a smoother texture and a richer taste. Melting chocolate usually requires tempering, a process of heating and cooling to stabilize the cocoa butter crystals for a glossy and stable finish.
- Almond Bark: Almond bark is a type of confectionery coating made from vegetable fats, flavorings, and sometimes added almond flavor. It melts easily and provides a smooth coating for cake pops. Almond bark is available in different colors and flavors and can be found in most grocery stores.
- White Chocolate: White chocolate, which contains cocoa butter, is another popular option for coating cake pops. It provides a creamy and luxurious taste. Like melting chocolate, white chocolate also requires tempering for the best results.
When choosing the best candy coating for cake pops, consider factors such as flavor, color, ease of use, availability, and personal preference. It’s always a good idea to follow the instructions on the specific product packaging for melting and coating techniques to achieve the desired outcome.
Best cake pop maker recipes
Here are a few popular and delicious cake pop recipes you can try with your cake pop maker:
Classic Vanilla Cake Pops:
- Prepare a vanilla cake according to your preferred recipe or using a cake mix.
- Crumble the cooled cake into fine crumbs.
- Mix in vanilla frosting until the mixture holds its shape.
- Shape into cake balls, place them in the cake pop maker, and cook according to the manufacturer’s instructions.
- Dip in melted white or colored candy coating and decorate as desired.
Chocolate Peanut Butter Cake Pops:
- Bake a chocolate cake and crumble it into fine crumbs.
- Mix in creamy peanut butter and a bit of chocolate frosting until the mixture holds together.
- Shape into cake balls, place them in the cake pop maker, and cook according to the instructions.
- Dip in melted chocolate candy coating, sprinkle crushed peanuts on top, and let them set.
Red Velvet Cake Pops:
- Prepare a red velvet cake using your favorite recipe or a cake mix.
- Crumble the cake and mix in cream cheese frosting until the mixture holds its shape.
- Shape into cake balls, place them in the cake pop maker, and cook as directed.
- Dip in melted white chocolate or cream cheese-flavored candy coating and decorate with red sprinkles or red velvet cake crumbs.
Lemon Raspberry Cake Pops:
- Bake a lemon-flavored cake and crumble it into fine crumbs.
- Mix in raspberry preserves or jam until the mixture holds together.
- Shape into cake balls, place them in the cake pop maker, and cook as instructed.
- Dip in melted white chocolate or lemon-flavored candy coating, and garnish with a fresh raspberry on top.
Funfetti Cake Pops:
- Prepare a funfetti cake mix according to the package instructions.
- Crumble the baked cake into fine crumbs.
- Mix in vanilla frosting and colorful sprinkles until the mixture holds its shape.
- Shape into cake balls, place them in the cake pop maker, and cook as per the directions.
- Dip in melted white chocolate or candy coating, roll in more sprinkles, and let them set.
Feel free to experiment with flavors, frostings, and coatings to create your own unique cake pop recipes. The possibilities are endless, and you can customize them to suit your preferences and occasion. Enjoy the process of making and decorating these delightful treats!
How long do homemade cake pops last?
Homemade cake pops can typically last for 2-3 days when stored properly. The exact shelf life may vary depending on various factors such as the ingredients used, the storage conditions, and the climate.
To ensure the longevity and freshness of your homemade cake pops, consider the following tips:
- Storage: Store the cake pops in an airtight container or cake pop stand to protect them from air and moisture. This will help prevent them from drying out and becoming stale.
- Refrigeration: If your cake pops have perishable fillings or frosting, such as cream cheese frosting, it’s recommended to store them in the refrigerator. The cool temperature will help maintain their freshness and prevent any potential spoilage.
- Room Temperature: If your cake pops have non-perishable fillings or coatings, they can be stored at room temperature in a cool and dry area. Avoid exposing them to direct sunlight or excessive heat, as it can cause the coating to melt or become soft.
- Avoid Humidity: High humidity can affect the texture and quality of cake pops. Keep them away from humid areas or use desiccant packets in the storage container to absorb any excess moisture.
- Individual Wrapping: For added protection, you can individually wrap each cake pop in plastic wrap or place them in small treat bags. This will help maintain their freshness and prevent them from sticking together.
It’s important to note that the texture and taste of cake pops may change over time, and they are generally best enjoyed within the first few days of making them. If you have concerns about the freshness or safety of your cake pops, it’s recommended to use your judgment and discard them if they show signs of spoilage, such as mold, off-putting odor, or significant changes in texture.
Final Thoughts
Cake pop maker recipes offer a delightful way to create bite-sized treats that are perfect for parties, events, or simply indulging in a sweet snack. From classic flavors like vanilla and chocolate to more adventurous combinations, there’s a cake pop recipe to suit every taste. The process involves baking a cake, crumbling it, mixing it with a binder such as frosting, shaping the mixture into balls, and cooking them in the cake pop maker. Once cooked and cooled, the cake pops can be dipped in melted chocolate or candy coating and decorated with sprinkles, drizzles, or other toppings.
The versatility of cake pop makers allows for experimentation and creativity. You can explore different cake flavors, fillings, and coatings to create unique combinations. Additionally, the cake pop maker can be used to make other treats like donut holes, pancake bites, or savory puffs, expanding its functionality.
When making cake pops, it’s important to consider factors such as the storage and shelf life of the finished product. Homemade cake pops generally last for a few days when stored properly in an airtight container or in the refrigerator, depending on the ingredients used.
Overall, cake pop maker recipes provide a fun and delicious way to enjoy bite-sized treats that are visually appealing and customizable. Whether you’re hosting a party, looking for a creative baking project, or simply craving a sweet treat, cake pop maker recipes offer endless possibilities to satisfy your taste buds.
Related Posts
What is a cake pop maker?
A cake pop maker is a small kitchen appliance specifically...
Read MoreHow do you use a mini cake pop maker?
A mini cake pop maker is a compact kitchen appliance...
Read More Post Views: 1,818
Why Trust Us
You will find what you are looking for at Jody's Bakery. From classic to luxury brands, you'll find both. We will help you to select appliances that fit your needs, budget and lifestyle. Whether you want to stop by to learn more — or plan to make a major purchase — we’ll treat you like family and assist you every step of the way. Shop with us today to receive friendly and experienced help along the way.


… [Trackback]
[…] Read More on that Topic: jodysbakery.com/cake-pop-maker-recipes/ […]
… [Trackback]
[…] Find More to that Topic: jodysbakery.com/cake-pop-maker-recipes/ […]
… [Trackback]
[…] Here you can find 78294 more Information to that Topic: jodysbakery.com/cake-pop-maker-recipes/ […]
… [Trackback]
[…] Read More on that Topic: jodysbakery.com/cake-pop-maker-recipes/ […]
… [Trackback]
[…] Read More on that Topic: jodysbakery.com/cake-pop-maker-recipes/ […]
… [Trackback]
[…] Find More Information here on that Topic: jodysbakery.com/cake-pop-maker-recipes/ […]
… [Trackback]
[…] There you will find 33048 more Information on that Topic: jodysbakery.com/cake-pop-maker-recipes/ […]
… [Trackback]
[…] Find More here to that Topic: jodysbakery.com/cake-pop-maker-recipes/ […]
… [Trackback]
[…] Find More on that Topic: jodysbakery.com/cake-pop-maker-recipes/ […]
… [Trackback]
[…] Find More to that Topic: jodysbakery.com/cake-pop-maker-recipes/ […]
… [Trackback]
[…] Find More on that Topic: jodysbakery.com/cake-pop-maker-recipes/ […]
… [Trackback]
[…] There you can find 2255 additional Information to that Topic: jodysbakery.com/cake-pop-maker-recipes/ […]
… [Trackback]
[…] Info on that Topic: jodysbakery.com/cake-pop-maker-recipes/ […]
… [Trackback]
[…] Find More on that Topic: jodysbakery.com/cake-pop-maker-recipes/ […]
… [Trackback]
[…] Info to that Topic: jodysbakery.com/cake-pop-maker-recipes/ […]