An immersion blender is a valuable appliance that simplifies kitchen...
Read More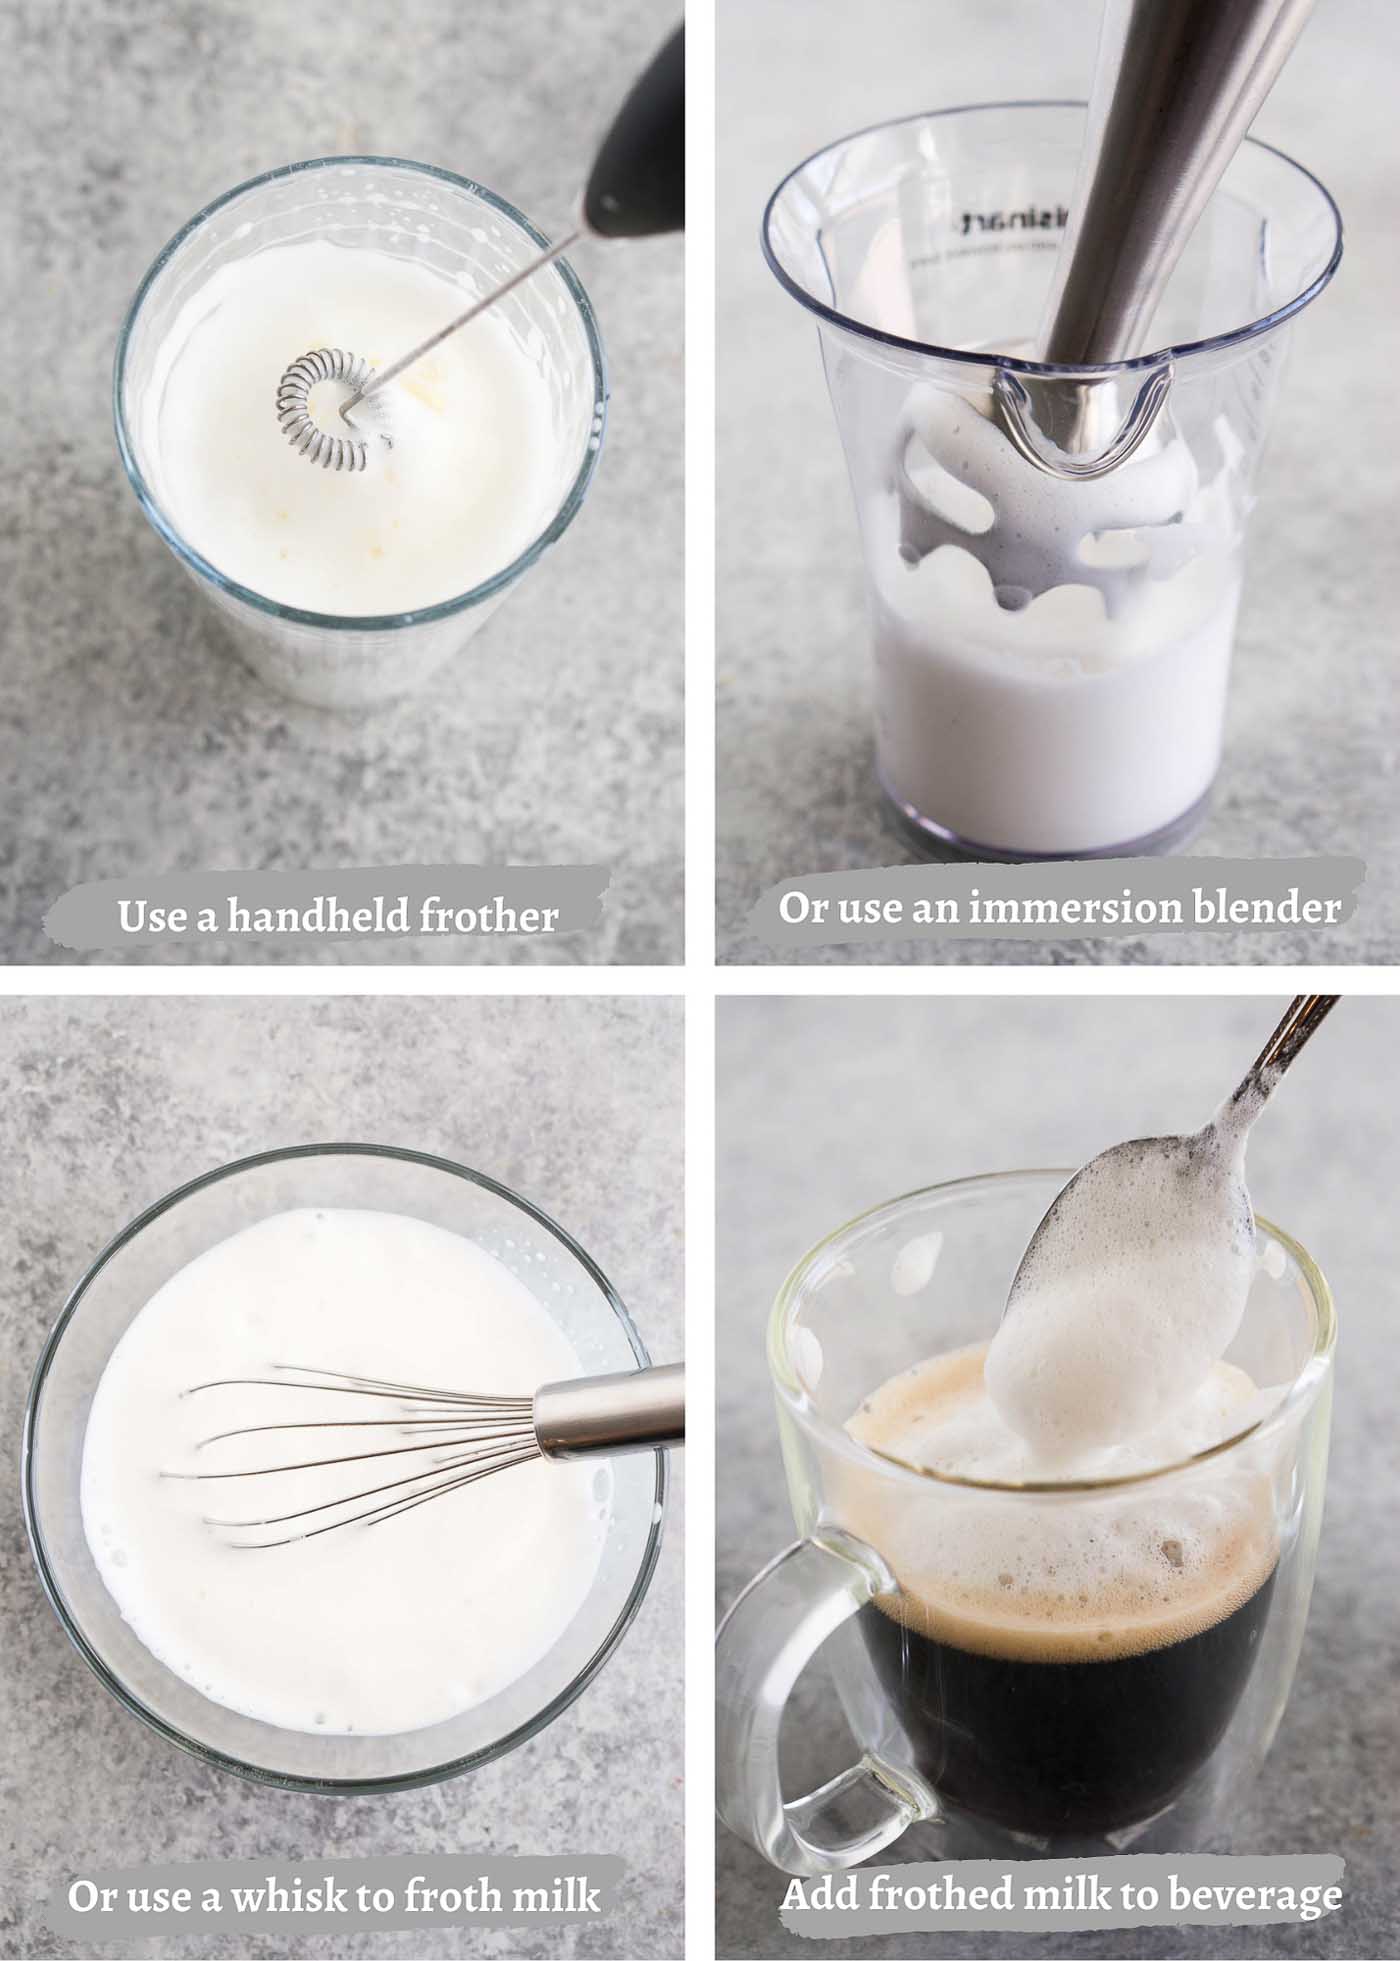
Frothing milk is a common technique used to make delicious beverages such as cappuccinos, lattes, and hot chocolate. While traditional methods involve using a whisk or a frother, using an immersion blender can be a quicker and more efficient way to create a rich and creamy froth. In this context, an immersion blender is a handheld kitchen appliance that can blend, puree, and emulsify ingredients, making it a versatile tool for any home barista. In this discussion, we will explore the benefits of using an immersion blender for frothing milk, how to do it correctly, and answer some common questions about the process.
Can you froth milk with an immersion blender?
Yes, you can froth milk with an immersion blender. In fact, many people find that an immersion blender is an excellent tool for frothing milk for drinks like lattes, cappuccinos, and hot chocolate. To froth milk with an immersion blender, you will want to warm the milk first, then immerse the blender in the milk and turn it on. Move the blender up and down in the milk to create froth, making sure to keep the blender submerged in the milk at all times. The frothing process should only take a few minutes.
Is a frother like an immersion blender?
A frother and an immersion blender are similar in some ways, but they are not the same thing. Both devices are used to create froth or foam, but they work differently and are designed for different purposes.
A frother, also known as a milk frother, is a handheld device that is specifically designed to froth milk. It typically consists of a whisk or a wand that is inserted into the milk and rapidly rotates to create bubbles and foam. Frothers are often used to create milk foam for cappuccinos, lattes, and other coffee drinks.
An immersion blender, on the other hand, is a handheld blender that is designed for mixing, pureeing, and blending. It typically has a motorized handle with a blade at the end that is submerged into the food or liquid to blend it. While an immersion blender can be used to froth milk, it is not specifically designed for that purpose, and it may not produce the same quality of foam as a dedicated frother.
What is the easiest way to froth milk?
One of the easiest ways to froth milk is by using an immersion blender. Here are the steps to follow:
- Pour milk into a microwave-safe container, leaving enough space for the milk to expand while frothing.
- Heat the milk in the microwave for about 30-45 seconds, or until it is hot but not boiling.
- Insert the immersion blender into the milk and turn it on. Hold the blender at an angle and move it around in a circular motion to create foam.
- Continue blending until you have achieved your desired amount of foam.
- Gently tap the container on a flat surface to remove any large bubbles.
- Pour the milk into your coffee or other beverage, holding back the foam with a spoon.
- Spoon the foam on top of your drink and enjoy!
Note that the amount of foam you can create may vary based on the type of milk you use and the power of your immersion blender.
Benefits of frothing milk with an immersion blender
Frothing milk with an immersion blender has several benefits, including:
- Convenience: Frothing milk with an immersion blender is a quick and easy process that can be done in just a few minutes, making it a convenient option for those who don’t want to spend a lot of time making coffee or other milk-based drinks.
- Cost-effective: Compared to buying a separate milk frother, using an immersion blender to froth milk is a more cost-effective option since many people already have an immersion blender in their kitchen.
- Customization: With an immersion blender, you can froth milk to your desired level of foaminess, allowing you to customize your coffee or other drinks to your liking.
- Versatility: Immersion blenders can be used for a variety of tasks, making them a versatile kitchen tool. So, by using it for frothing milk, you can get more out of your investment.
- Easy to Clean: Cleaning an immersion blender is a breeze, especially when compared to other frothing devices. Just rinse the blending wand under running water and wipe it dry, and you’re done.
What is the difference between a bread knife and a serrated knife?
A bread knife is a type of serrated knife that is specifically designed for cutting through bread. While both a bread knife and a serrated knife have a saw-like edge, there are some key differences between the two:
- Blade length: A bread knife typically has a longer blade than a serrated knife, which makes it easier to slice through larger loaves of bread.
- Blade shape: A bread knife usually has a slightly curved or wavy blade that allows it to rock back and forth as you cut through bread, while a serrated knife may have a straight or slightly curved blade.
- Teeth spacing: The teeth on a bread knife are usually spaced farther apart than those on a serrated knife, which allows it to cut through bread without crushing or compressing the loaf.
- Purpose: While a bread knife is specifically designed for cutting through bread, a serrated knife can be used for a variety of cutting tasks, including slicing meats, fruits, and vegetables.
Overall, while there are some differences between a bread knife and a serrated knife, they are both useful kitchen tools that can make cutting tasks easier and more efficient.
How do you use an immersion blender as a frother?
To use an immersion blender as a frother, follow these steps:
- Pour the desired amount of milk into a microwave-safe container or stovetop pitcher.
- Heat the milk until it reaches the desired temperature. For a latte or cappuccino, heat the milk to between 140-160°F (60-71°C).
- Place the immersion blender into the milk at an angle so that the blades are just below the surface of the milk.
- Turn on the immersion blender and move it up and down in the milk to create froth. The longer you blend, the more froth you will create.
- Once the milk is frothed to your liking, turn off the immersion blender and remove it from the milk.
- Pour the frothed milk into your coffee or espresso shot and enjoy!
How long should you froth milk with an immersion blender?
The duration of frothing milk with an immersion blender may depend on personal preference and the type of milk being used. In general, frothing milk with an immersion blender takes about 15-30 seconds. However, it’s best to keep an eye on the milk and stop blending when it reaches the desired consistency or when it starts to form stiff peaks. Over-frothing can cause the milk to become too thick or curdled, which is not desirable.
Factors to consider when choosing the best immersion blender for frothing milk
When choosing the best immersion blender for frothing milk, here are some factors to consider:
- Power: A more powerful immersion blender will produce better froth. Look for an immersion blender with at least 200 watts of power.
- Speeds: Choose an immersion blender with multiple speed settings, as this will give you more control over the frothing process.
- Blade design: Look for an immersion blender with a whisk attachment or blade design that is specifically designed for frothing milk. Some immersion blenders may come with interchangeable attachments for different tasks.
- Ergonomics: Choose an immersion blender that is comfortable to hold and easy to maneuver. A lightweight model with a comfortable grip will make it easier to froth milk for longer periods of time.
- Durability: Look for an immersion blender that is made from high-quality materials and is built to last. Stainless steel and heavy-duty plastic are both good options.
- Price: Immersion blenders range in price from budget-friendly to high-end. Consider your budget and choose an immersion blender that meets your needs without breaking the bank.
How to clean offset immersion blender after frothing milk
To clean an immersion blender after frothing milk, follow these steps:
- Unplug the immersion blender and detach the blending attachment from the motor.
- Rinse the blending attachment under running water to remove any milk residue.
- Fill a container with warm water and add a few drops of dish soap.
- Immerse the blending attachment into the soapy water and turn on the immersion blender. Run it for a few seconds to allow the soapy water to clean the attachment.
- Turn off the immersion blender and remove the blending attachment from the soapy water.
- Rinse the blending attachment under running water to remove any soap residue.
- Use a clean cloth or paper towel to dry the blending attachment.
- Reattach the blending attachment to the motor and store the immersion blender in a dry place.
It’s important to clean the immersion blender thoroughly after frothing milk to avoid any milk residue building up and causing bacterial growth.
How to maintain immersion blender properly
Proper maintenance of your immersion blender can extend its lifespan and ensure that it continues to work efficiently. Here are some tips for maintaining your immersion blender:
- Clean the blender after every use: After using the blender, detach the blending shaft and clean it thoroughly with warm soapy water. Wipe the motor unit with a damp cloth and dry it completely.
- Lubricate the blender shaft: Lubricate the blending shaft with a small amount of food-safe oil to keep it running smoothly.
- Store the blender properly: Store the blender in a dry and cool place, and keep it away from direct sunlight. Avoid storing it in a place where it can get bumped or knocked over.
- Use the blender with care: Don’t use the immersion blender for tasks that it’s not designed for. Avoid blending hard or frozen ingredients, and never use the blender to chop ice.
- Replace worn or damaged parts: Check the blender regularly for signs of wear or damage, and replace any worn or damaged parts promptly.
By following these tips, you can help ensure that your immersion blender stays in good working order for years to come.
Troubleshooting about frothing milk with an immersion blender
There are several issues that can occur while frothing milk with an immersion blender. Here are some troubleshooting tips:
- Not getting enough foam: Make sure that you are using the right type of milk for frothing. Whole milk, 2% milk, or non-dairy milk alternatives like soy or almond milk tend to work best. Also, make sure that the milk is cold before frothing. If the milk is too hot, it won’t froth properly. Finally, make sure that you are using the right technique to froth the milk.
- Too much foam: If you end up with too much foam, try using less milk or frothing the milk for a shorter amount of time.
- Splattering: If the milk splatters while you are frothing, make sure that the immersion blender is fully submerged in the milk. Also, try using a larger container to froth the milk in.
- Burnt smell: If you smell something burning while frothing, make sure that the immersion blender is not touching the bottom of the container. Also, make sure that you are not overheating the milk.
By following these troubleshooting tips, you can froth milk with an immersion blender more effectively and avoid common issues.
Froth milk with an immersion blender - FAQs
Some frequently asked questions about frothing milk with an immersion blender include:
Yes, you can froth cold milk with an immersion blender, but it may take longer to achieve the desired froth compared to using warm milk.
Yes, you can froth milk with a cordless immersion blender as long as it has a whisk attachment.
Yes, you can froth almond milk with an immersion blender, but some brands of almond milk may not froth as well as others due to differences in their protein content.
Yes, you can froth milk without a frother or immersion blender by shaking it vigorously in a closed container or using a French press.
You should froth milk with an immersion blender for about 15-30 seconds, depending on the desired level of frothiness.
Is it worth getting an immersion blender?
Yes, getting an immersion blender is worth it, especially if you like to cook or bake frequently. An immersion blender is a versatile and convenient tool that can be used for blending soups, sauces, smoothies, and even frothing milk. It is easy to use and takes up less space in the kitchen compared to a traditional blender. Additionally, immersion blenders can be more affordable than other types of blenders, making it a great investment for those on a budget.
Related Posts
Best cordless immersion blenders with an honest review
When it comes to saving space, cordless immersion blenders are...
Read MoreBest immersion blender for smoothie and soup reviews – Don’t miss it!
An immersion blender is a little bit of a misnomer...
Read MoreWhy Trust Us
You will find what you are looking for at Jody's Bakery. From classic to luxury brands, you'll find both. We will help you to select appliances that fit your needs, budget and lifestyle. Whether you want to stop by to learn more — or plan to make a major purchase — we’ll treat you like family and assist you every step of the way. Shop with us today to receive friendly and experienced help along the way.


… [Trackback]
[…] Read More here on that Topic: jodysbakery.com/can-you-froth-milk-with-an-immersion-blender/ […]
Muchas gracias. ?Como puedo iniciar sesion?
… [Trackback]
[…] Find More Info here on that Topic: jodysbakery.com/can-you-froth-milk-with-an-immersion-blender/ […]
… [Trackback]
[…] There you will find 71258 more Info on that Topic: jodysbakery.com/can-you-froth-milk-with-an-immersion-blender/ […]
… [Trackback]
[…] Read More on that Topic: jodysbakery.com/can-you-froth-milk-with-an-immersion-blender/ […]
… [Trackback]
[…] Here you will find 34139 additional Information to that Topic: jodysbakery.com/can-you-froth-milk-with-an-immersion-blender/ […]
… [Trackback]
[…] Find More to that Topic: jodysbakery.com/can-you-froth-milk-with-an-immersion-blender/ […]
… [Trackback]
[…] Information to that Topic: jodysbakery.com/can-you-froth-milk-with-an-immersion-blender/ […]
… [Trackback]
[…] There you can find 33304 additional Information on that Topic: jodysbakery.com/can-you-froth-milk-with-an-immersion-blender/ […]
… [Trackback]
[…] Info on that Topic: jodysbakery.com/can-you-froth-milk-with-an-immersion-blender/ […]
… [Trackback]
[…] Read More Info here on that Topic: jodysbakery.com/can-you-froth-milk-with-an-immersion-blender/ […]
… [Trackback]
[…] Read More here on that Topic: jodysbakery.com/can-you-froth-milk-with-an-immersion-blender/ […]