Do you know how to make whipped cream? This one is a huge question I’ve been receiving in my inbox lately. So I told myself, “I’m going to put up a guide about it and include tips and tricks and recipes to make with this fabulous food.” And now here I am, at last!
I’m a huge fan of whipped cream, and maybe you are, too. But we all know the calories on it, don’t we? Still, we crave for it once in a while and dollop a generous amount of it on our favorite strawberries, or put some on top of a cup of coffee, like a cold latte.
The whole point is that whipped cream can turn an ordinary snack, dessert, or drink into a fun, extraordinary indulgence for our taste buds. It just gives that luxurious lightness to food and that ooh-la-la sweet flavor and creamy texture.
And when added on top of our cupcakes or mint cakes, it just makes the whole thing extra glorious and royal. That’s not all. Whipped cream also makes for delicious ice cream sundaes. Oh, I can’t wait for the weekend again, as it’s my cheat day. Well, is it yours, too?
The only problem is that we might not always have a supply of whipped cream at home, and I also don’t like the thought of using aerosol filled and canned variants sold on the market.
Homemade whipped cream is unbeatable by any of the top brands out there – the reason is it is made with L-O-V-E. And it’s also easy to make! That’s at least great news, and I’m not kidding. I looked up information and ways on how to make it ourselves.
As you know, sometimes we just needed a dollop of it in one of our afternoon pick-me-up snacks or cup of milk chocolate cooled perfectly in our beverage cooler, and we don’t want to spend much on those expensive frozen tubs available.
Plus, if we’d learn how to make it, just as we would know how to make buttermilk, things would get a little bit more exciting and fun in the kitchen. So, come on and get ready to WOW your friends, as we learn how to make whipped cream in quick and simple ways!
What you need to know about whipping creams before making whipped cream at home: Many of them have a milk fat content ranging between 30% and 35%. And then heavy creams have around 36% milk fat content. You can make use of either in making homemade whipped creams, not any other types of milk. Lower than this level of milk fat won’t be whipped into whipped creams. Also, there isn’t any low fat whipped cream anywhere in the world, so don’t believe any marketing ploys claiming it.
Ways To Make Whipped Cream
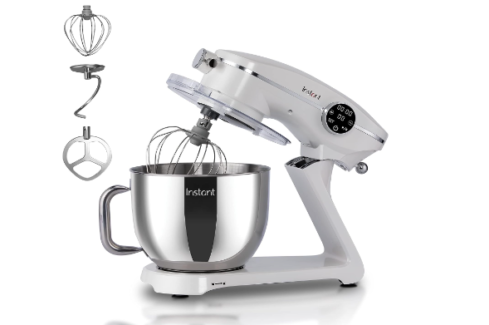
1. Using a stand mixer with a whisk attachment
The following recipe can make about two cups, just enough for a medium-sized party, maybe. You can prepare this recipe in a couple of minutes. Just take note of the ingredients as mentioned below. The time for whipping the cream can be shorter if you’re going to set your quiet stand mixer at a higher speed than you would with a medium speed. Of course, whipping time will be longer if you’re manually doing the process.
| Step 1 | Get your measuring cup and a cup of heavy cream or whipping cream as well as a teaspoon of vanilla. You need a stand mixer that has a whisk attachment, or you can make use of a bowl and a whisk. |
| Step 2 | Pour your whipping cream into a bowl, and put your cream in the fridge. When you’re ready to whip it, you can measure that in your bowl. |
| Step 3 | Start whipping and increase from medium to high speed as you’re whipping. Notice that your cream will be bubbly and frothy in the first minutes. |
| Step 4 | Look for several trails in the cream. These will show after four to five minutes. As you’re noticing when these cream trails do not dissolve faster after your whisk moves, then the cream is reaching the ‘soft plop’ stage. And then, the whipped cream is not going to hold to the whisk when you take it out your bowl. |
| Step 5 | Notice the soft peaks in seven minutes, and you will reach the ‘soft peak’ stage when the cream trails become solid and a dribble of the cream is floating on the cream’s surface. The peaks will hold firmly on the whisk but they still have these softened tips. When you notice such change, you can stop the process and serve the whipped cream. |
| Step 6 | If you keep on whipping, you will notice the stiffening of the cream, which will begin giving it a grainy texture. The peaks are going to stiffen completely when you take your whisk out the cream. [Note: Don’t get overly excited and keep whipping, or else, you will make butter!] |
| Step 7 | Serve the cream, or store it in the fridge for a couple of hours if you still have the time left before the party. After all, chilled whipped cream makes things a bit more exciting, do you agree? |
Notes:
The cream can double when whipped. So it goes like that you will need a cup of it to make two cups and so on. Two cups of whipped cream can serve up to 10 people in your party. Before making whipped cream then, count the number of guests to prepare just the right amount needed. Also, it might be better to go a little over beyond the required amount than to run short of supply in the middle of the gathering.
If you want to make your whipped cream extra exciting, you may want to experiment with several flavors. Just like preparing several batches for some choices for everyone. You can get extra creative by adding some almond extract, orange extract or rum, or perhaps, some melted chocolate or citrus zest! There are no limits to your imagination.
Use the method if you want to come up with a large amount of whipped cream because the attachment might not work the bottom of your bowl, meaning what is underneath might not be whipped properly. And to sweeten the cream using this method, you may also want to make use of confectioner’s sugar, not granulated. The point is that the whisk attachment might not be able to touch the granulated sugar at the bottom of the bowl; thus, it will sit there not dissolved. And to get an even whip, you should use lower speeds.
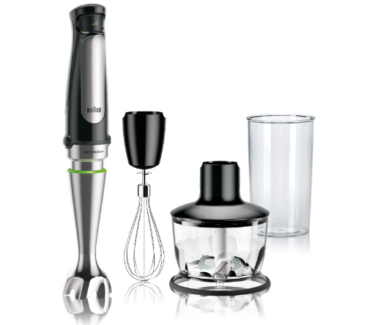
2. Using an immersion blender
If you want to make homemade whipped cream in less than a minute, then get your immersion blender ready, along with the ingredients we’ll need for this method. Just like from other methods, it will yield two cups of cream for every cup of cream.
| Step 1 | Get a cup of heavy cream and a tablespoon of sugar. |
| Step 2 | Mix both in a container or bowl. |
| Step 3 | Get your immersion blender and start whip for about 30 seconds. Move it up and down, ensuring that the cream will be mixed evenly. Keep doing it until you can notice soft peaks. |
| Step 4 | Serve your cream or store it in the fridge until you’re ready. |
3. Using a food processor
This food processor method works pretty much just like the others we’ve presented earlier. It is also handy and it gives out just that heavenly lump of whipped cream needed for our baked goodies or drinks. We can prepare this recipe for about a minute or less, and the steps are quite simple. Check them out below.
| Step 1 | Chill your cream in the fridge. |
| Step 2 | Pour vanilla and sugar into the bowl and then add the cream. |
| Step 3 | Turn the food processor on and start whipping, fellows! Keep whipping for up to two minutes until you notice soft peaks forming and if the cream passes the consistency test –get some of the cream and then check out its runniness. If it runs slowly to the sides of the whisk or spoon down, then you’re certain that you have the perfect whipped cream. |
4. Using a whisk and a trusty bowl
Now don’t fret if you don’t have a milkshake blender. You can make use of a balloon whisk and a bowl. After all, using this method will bring out the consistency you need to make a whipped cream. All you need is a little patience and you’ll be fine. Trust me. This method is also one of the simplest without any machines involved. You will also get to enjoy every effort you’ll spend in the process, as you’re watching your heavy cream transform from the liquid into a beautiful cloud with every whip you give it. And because you will be using a manual method like this one, you can prevent over-whipping your cream.
| Step 1 | Pour a cup of whipping cream or a heavy cream in a bowl. One cup makes two cups of whipped cream approximately. |
| Step 2 | Add the sugar. Choose granulated, not the confectioner’s sugar. The cornstarch in the confectioner’s variant can make your whipped cream gritty in texture. |
| Step 3 | Add a small amount of vanilla extract for some flavor. Typically, a teaspoon for every cup will do. But of course, you can go ahead and experiment as desired. You can also substitute vanilla with melted chocolate or lemon zest, to name two options. |
| Step 4 | Notice the large bubbles forming on top of the cream. After a couple of minutes, you will start seeing those bubbles going away, and a thickened cream will be replacing them. Keep on whisking because the mixture will still be runny at this point. You should keep working and inputting effort to thicken the cream a bit more. |
| Step 5 | As you go on, you will notice the soft, lovely peaks forming. They look awesome, and they’re heavenly to the sight! To test for the soft peaks, get your whisk out your bowl while flipping it over to take note of whipped cream falling slightly – now that’s a perfect consistency! And you’ve just made a cup of whipped cream ready for serving. |
5. Using a cocktail shaker
This method is quite unconventional when making whipped cream, but pretty useful, too, if you have the Hawthorne strainer or a cocktail strainer. Just take out the spring from it, and we can work on the whipping process. The method is somehow similar to our jar method, but this one just makes use of a cocktail shaker.
| Step 1 | Measure one cup of heavy cream and chill it in the fridge for a few hours before whipping. |
| Step 2 | After, you can get your chilled cream out the refrigerator, pour it in the cocktail shaker and add vanilla and sugar to it. |
| Step 3 | Close the shaker and then shake, shake and shake! Do it for a couple of minutes to whip the cream into whipped cream. Spoon out some and check for consistency. And it is running slowly to the side of the spoon, you’re ready for some Ooh-la-las! Serve it to your guests and see them adoring the perfection of your whipped cream. |
6. Using a whipped cream dispenser
Yes, this method might sound uncommon, but it is also useful if you already have this type of appliance at home. If you need a good dose of whipped cream fast, then you should not think twice but make use of this method. This type of gadget is handy and convenient when preparing some good amount of cream for a group.
And just like in the other methods, you can make use of additional flavorings for your cream. Perhaps, you can get your wine aerator and get a shot of wine to add in the whipped cream if you are serving for adult guests who happen to enjoy wine as much as you do. This dispensing appliance works with nitrous oxide cartridges used in pressurizing cream, sugar, and flavorings used in the cream.
| Step 1 | Measure a cup of whipping cream. |
| Step 2 | Add sugar and vanilla or another flavoring on it. |
| Step 3 | But because such dispensers do not work in the same manner, you should check for the complete maker’s instructions on how to use it. Generally, it can make consistent whipped cream that you can easily squirt out the nozzle. |
7. Using a hand mixer, but this time with added sugar on your whipped cream
Just as using a stand mixer with whisk attachment, you can also make use of a hand mixer plus sugar in your ingredients! Take note, though, this method of making whipped cream might not give you an even whipped cream as you would get when working on the cream manually with a balloon whisk.
| Step 1 | Measure heavy cream and pour one cup of it into your mixing bowl. |
| Step 2 | In the beginning, you will see large bubbles and soft peaks later. Keep on whisking. At this point, there will still be liquid underneath. |
| Step 3 | To reach the soft peaks in your whipped cream, you can keep on working on it and then try to solve the problem of liquid underneath by using a low speed in your hand mixer. |
8. Using a Jar
If you want some whipped cream for your protein shakes, then you can make little amounts of it using a jar. Yes, that’s right! You can make use of it in making a homemade whipped cream. Having heard about this old school method the first time, you are probably thinking what a jar has to do with the whip making process.
And maybe you are guessing by now that we’re going to shake the jar up until we come up with a whipped cream, and you’re right! The only thing to note on is to stop shaking before we reach the butter stage. In this method, you don’t need a food processor, but your arms and some music for the groove you’ll do later.
Now to give you a better picture of what is exactly going to happen here, take a look below.
| Step 1 | Get your heavy cream and fill your jar only halfway and then adding vanilla and confectioner’s sugar. |
| Step 2 | Turn the music on and shake it, baby! Shake the covered jar vigorously so that your cream will thicken when the liquid turned to a cloud of delicious cream! Keep shaking but do not over-shake it, or else, you will make butter instead of a whipped cream. |
| Step 3 | When your cream makes soft peaks, you are ready to serve whipped cream on top of a cupcake or cappuccino for your friends. [Yes, I know. This method is a bit tiring, but hey, it won’t hurt to work your arms for a couple of minutes. After all, it is multitasking! You can make whipped cream while exercising and toning your arms. Doesn’t that sound like an idea? |
Bonus Tricks
- If you want your kids to enjoy your dessert more, try the recipe that adds a twist to our regular puffs from I am Baker. It shares an amazing chocolate puff that you can try for yourself. Thanks to I am Baker for sharing this tip!
- It states using only whipping cream or heavy cream when whipping cream and suggests using a food processor for longer lasting whipped creams. Thanks to The Kitchn on what they’ve shared on making and storing better whipped cream!
- It states that you can use whipped cream frosting for your cake if you don’t have the time to make buttercream frosting or fondant. Thanks to Simply Baking for such fantastic tips!
- There are other tips to find from this source, and one of it includes using an electric beater or a balloon whisk when whipping cream. It will whip faster if it and the bowl are chilled. Thanks to Taste.com.au for this whipped cream tip!
- Spoon some of the cream to test for its consistency. When it is not dropping off easily, it should be fine to serve. Thanks to Tarladalal for sharing it with us!
Pro Tips from Other Bloggers
- If you have not checked this website, you better should. I find it fun and interesting, especially great cooking tips and tricks and recipes write-up. I found an amazing tip from Joanne, a contributor of the website on how to make lovely whipped cream to perfection. On this site, you will learn how to make it using a large bowl and a balloon whisk. It is just so easy! If you have not tried the method, you can get tidbits of advice from it and you’ll be amazed. Also, take note that Pioneer Woman also takes note of chilling everything and using two tablespoons of sugar for each cup of cream. But of course, it also suggests of adjusting the sweetness to your preference.
- Contributor Sommer of A Spicy Perspective shares wonderful tips and tricks on how to make our kitchen lives easier. On this post, it shares a new twist on our favorite shortbread. See how it added that spicy perspective into this old family tradition desert each of us enjoys!
- Chocolate Porter Beer Tart – Okay, yes, a porter beer, you got that right! Jackie of The Beeroness shares its cool recipe on how to make the union of chocolate and porter better – by turning it into a desert. Some of us might not think this could even be possible, but it is.
- I love The Kitchn, a rich source of information for aspiring chefs and excellent homemakers alike. The site is loaded with the cooking information we need, as well as tips on how to survive our lives in the kitchen. One of those resources I found here is by Christine Gallaryon how to freeze leftover whipped cream. It suggests that you can pop the entire container in the freezer until the whipped cream turned into solid before storing it in a freezer safe bag. With such useful information, we don’t have to toss leftover whipped cream but just freeze it until we’re ready to use it again! For example, you can just add a mound of it on top of your coffee or chocolate drink on which you want to add a creamy touch.
- All Recipes is a great portal of information, and I must say that I am always using it (big fan here!) I found great tips by Karen Gaudette Breweron how to cook with whipped cream on the site. This particular one I founds is so helpful. It says that we need to avoid light coconut milk variation because it won’t whip; instead, we need organic coconut milk.
- Start Cooking is another source I find valuable for cooking with whipped cream. The particular post I found is on tips on how to use it. Some I learned included using it on top of fruit crisps, cakes, pies and French toast, to name some. It also suggests adding a spoonful of it on hot chocolate or coffee. If you’re looking for useful tips on how to use whipped cream, I recommend this website for your reference.
- There are also whipped cream tips I found on the Prepared Pantry, and they are great additions in our arsenal of knowledge when it comes to baking and cooking with whipped cream. It recommends using powdered sugar, not granulated one for sweetening our cream and it adds that we have to avoid using fresh cream. It states that using it is best to use it after a few days.
- Mary Jane Robbins of King Arthur Flour’s Blog recommends using the right dairy product for the whipped cream and suggests using heavy cream with 36% minimum milk fat content. And I agree. It also adds that ultra-pasteurized dairy products can make a good whipped cream but the flavors might just be not as good. So if you can, the site suggests using standard pasteurized cream that can whip up easier and keep better peaks than others can.
- One of the tips I found on this useful source, Dairy Goodness, is that cream can be used to replace coconut milk in recipes. It also states that cream can add tenderness, richness and moisture to our dough and other baked goods. You can find other tips as to how to cook with cream in our kitchens. Forgot to say, the site also suggest we can make cappuccino by whipping cream until it is thickened and then stirring it into our cup of coffee. To finish it off, we can sprinkle it with cinnamon.
- Food 52 is a classic favorite. A contributor of the site, Alice Medrich, provides loads of information about cooking and baking that we should not miss. It says that we should find a cream brand with only one ingredient, which is cream for the best results. Check out the site and see what else you can learn from the particular post I found.
Correcting Common Problems
Good question it is. The whipped cream can hold up to an hour in your fridge, and then it will start deflating and watery after.
Add in one-fourth cup of sour cream, crème fraiche or Greek yogurt when the cream reached its soft peak stage.
Just remember that cream will double in size when you whipped it. So if you want two cups of whipped cream, use one cup of whipping cream.
Yes, it is advised to keep it as cold as your cream so that you can whip easier.
You need one tablespoon for every cup, or even less or more. It depends on your sweetness preference.
You need to fold them in before reaching stiff peaks. Or else, you will be over-mixing.
Related Posts
Why Trust Us
You will find what you are looking for at Jody's Bakery. From classic to luxury brands, you'll find both. We will help you to select appliances that fit your needs, budget and lifestyle. Whether you want to stop by to learn more — or plan to make a major purchase — we’ll treat you like family and assist you every step of the way. Shop with us today to receive friendly and experienced help along the way.