A cupcake maker is a handy kitchen appliance that allows...
Read More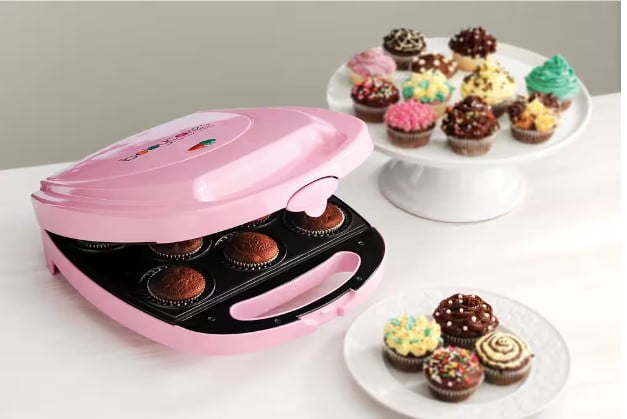
Mini cupcake makers are a fantastic tool for creating bite-sized treats that are perfect for parties, gatherings, or simply indulging in a small portion of sweetness. With a mini cupcake maker, you can easily whip up a variety of delicious mini cupcakes in no time. From classic flavors to creative combinations, the possibilities are endless.
Mini cupcake maker recipes often include traditional cake flavors such as vanilla, chocolate, or red velvet, but you can also experiment with unique flavors like lemon, strawberry, or even funfetti. The recipes typically guide you through the process of preparing the batter, filling the mini cupcake cavities, and baking them to perfection.
Furthermore, mini cupcakes are an excellent canvas for creativity. You can decorate them with various frostings, sprinkles, edible glitter, or miniature toppings like fruits, candies, or nuts. These tiny treats are not only delightful to eat but also visually appealing and fun to customize.
Whether you’re a baking enthusiast or just starting out, mini cupcake makers offer a convenient and enjoyable way to create mini delights that are sure to impress. With a wide range of recipes available, you can cater to different tastes and preferences, ensuring there’s a mini cupcake to please everyone’s palate. So, gather your ingredients, let your imagination run wild, and enjoy the delightful world of mini cupcake making!
What is the difference between cupcake and cake mix?
The main difference between cupcake mix and cake mix lies in their intended use and consistency. While both cupcake mix and cake mix are similar in terms of ingredients, the ratios and preparation methods may vary slightly.
Here are some key differences between cupcake mix and cake mix:
- Texture: Cupcakes are typically smaller and individual-sized, which means they require a slightly different texture compared to a traditional cake. Cupcake mixes are formulated to create a lighter and more tender texture, ensuring that the cupcakes bake evenly and rise properly.
- Portion size: Cupcake mixes are designed to yield a specific number of cupcakes, usually around 12 to 24, depending on the recipe and pan size. Cake mixes, on the other hand, are meant for larger cakes that serve more people. The proportions of ingredients in the mix are adjusted to match the desired portion size.
- Baking time: Cupcakes generally require a shorter baking time compared to cakes. The smaller size of cupcakes allows them to bake faster and more evenly. Cake mixes often provide instructions for different pan sizes and may require longer baking times.
- Frosting and decoration: Cupcakes are often frosted and decorated individually, making them ideal for customization and personalization. Cake mixes may include instructions for layer cakes that can be frosted and decorated as a whole.
While the primary difference lies in the intended use and proportions, it’s worth noting that some cake mixes can also be used to make cupcakes, and vice versa. However, if you’re specifically looking to make cupcakes, using a cupcake mix can ensure optimal results in terms of texture, portion size, and baking time.
What is the difference between standard and mini cupcakes?
The main difference between standard and mini cupcakes lies in their size and baking time. Here are the key distinctions:
- Size: Standard cupcakes are larger and typically have a diameter of around 2 to 3 inches (5 to 7.5 cm) at the top. They are meant to be an individual-sized dessert that can be enjoyed in a few bites. Mini cupcakes, on the other hand, are significantly smaller, with a diameter of around 1 to 1.5 inches (2.5 to 3.8 cm) at the top. They are often considered bite-sized treats.
- Portion: Due to their larger size, standard cupcakes are more substantial in terms of portion. They provide a satisfying dessert experience in a single serving. Mini cupcakes, being smaller, offer a smaller portion size and are often enjoyed as bite-sized treats or at events with multiple desserts.
- Baking time: The smaller size of mini cupcakes means they require less time to bake compared to standard cupcakes. Mini cupcakes typically bake faster because their smaller size allows for quicker heat distribution and even baking. Standard cupcakes require a longer baking time to ensure the center is fully cooked and the top is golden brown.
- Presentation: Standard cupcakes offer more surface area for decorating and adding frosting, allowing for elaborate designs and decorations. Mini cupcakes, although smaller, can still be decorated with frosting, sprinkles, or other toppings, but their smaller size limits the amount of decoration space.
When choosing between standard and mini cupcakes, consider the occasion, portion size desired, and the time available for baking. Standard cupcakes are great for parties, special occasions, or when you want a more substantial dessert. Mini cupcakes are ideal for events with multiple desserts, bite-sized treats, or when you want to offer a variety of flavors.
Why should you buy mini cupcake maker?
There are several reasons why you might consider buying a mini cupcake maker:
- Convenient Size: Mini cupcakes are adorable bite-sized treats that are perfect for parties, gatherings, or when you want a smaller portion of dessert. A mini cupcake maker allows you to easily bake a batch of mini cupcakes without needing a full-sized oven or specialized baking pans.
- Quick and Easy: Mini cupcake makers are designed to heat up quickly and cook the cupcakes in a fraction of the time compared to traditional baking methods. They offer a convenient and time-saving alternative to baking in a regular oven.
- Versatility: Mini cupcake makers are not limited to just cupcakes. You can also use them to make other baked goods like muffins, brownie bites, cake pops, or even savory snacks like mini quiches or frittatas. This versatility allows you to experiment with different recipes and create a variety of treats.
- Portability: Mini cupcake makers are compact and portable, making them a great option for those who enjoy baking on the go or for taking to potlucks, picnics, or other events. They are lightweight and easy to transport.
- Kid-Friendly: Mini cupcake makers are often a hit with children. Kids can participate in the baking process, decorate the mini cupcakes, and enjoy the smaller-sized treats. It can be a fun activity for the whole family.
- Easy Cleanup: Mini cupcake makers typically have non-stick surfaces, making it easier to remove the cupcakes and clean the appliance afterward. They often require simple wipe-down or handwashing, reducing the time and effort spent on cleanup.
When considering a mini cupcake maker, it’s important to assess your baking needs, the frequency of use, and the available kitchen space. If you enjoy baking and serving bite-sized treats or want a convenient and efficient way to make mini cupcakes, a mini cupcake maker can be a worthwhile addition to your kitchen.
Can you make mini cupcakes ahead of time?
Yes, you can make mini cupcakes ahead of time. Making them in advance can be convenient for parties, events, or when you want to save time on the day of serving. Here are some guidelines for making mini cupcakes ahead of time:
- Baking: Bake the mini cupcakes according to your recipe instructions. Allow them to cool completely before proceeding.
- Storage: Once the cupcakes have cooled, place them in an airtight container or a cake carrier to protect them. Make sure the container is suitable for the size of the mini cupcakes to prevent them from getting squished or damaged.
- Refrigeration or Freezing: Depending on how far in advance you are making the mini cupcakes, you have two options for storage:
Refrigeration: If you plan to serve the cupcakes within a couple of days, you can store them in the refrigerator. Keep in mind that refrigeration may cause the cupcakes to lose some moisture, so it’s important to keep them in an airtight container to prevent drying out.
Freezing: If you are making the mini cupcakes well in advance, you can freeze them for longer storage. Place them in an airtight container or freezer bags, and make sure to label them with the date. Thaw the frozen cupcakes at room temperature when you’re ready to serve.
- Frosting: It’s generally recommended to frost the mini cupcakes closer to the time of serving. If you frost them too far in advance, the frosting may lose its freshness and texture. Store the frosted cupcakes in the refrigerator if the frosting requires refrigeration.
- Refreshing: If you find that the mini cupcakes have slightly dried out during storage, you can refresh them before serving. Lightly brush them with a simple syrup or a flavored syrup to add moisture.
Remember, while making mini cupcakes ahead of time can save you effort on the day of serving, it’s always best to consume them within a few days for the freshest taste and texture.
How do you use a mini cupcake maker?
Using a mini cupcake maker is a simple and straightforward process. Here’s a step-by-step guide on how to use a mini cupcake maker:
- Preheat the cupcake maker: Before you start, make sure to preheat the mini cupcake maker according to the manufacturer’s instructions. This usually involves plugging in the appliance and allowing it to heat up for a few minutes.
- Prepare the batter: While the cupcake maker is preheating, prepare your cupcake batter according to your favorite recipe or a pre-packaged mix. Mix the ingredients together until you have a smooth and well-combined batter.
- Grease the cavities: Lightly grease the cavities of the mini cupcake maker with cooking spray or a small amount of melted butter. This will help prevent the cupcakes from sticking to the baking surface.
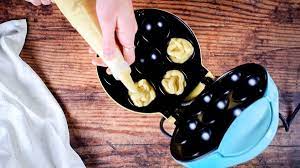
- Fill the cavities: Using a spoon, piping bag, or a small scoop, carefully fill each cavity of the cupcake maker with the prepared batter. Be sure not to overfill the cavities, as the batter will expand while baking.
- Close the lid: Close the lid of the cupcake maker securely, making sure it’s properly aligned with the cavities.
- Bake the cupcakes: Allow the cupcakes to bake for the recommended time specified in your recipe or the manufacturer’s instructions. The baking time is usually shorter for mini cupcakes compared to regular-sized cupcakes, typically ranging from 5 to 10 minutes.
- Check for doneness: After the suggested baking time has elapsed, check the cupcakes for doneness. They should be firm to the touch and a toothpick or cake tester inserted into the center should come out clean or with a few moist crumbs.
- Remove and cool: Once the cupcakes are fully baked, carefully open the lid of the cupcake maker and use a fork or a small spatula to gently remove the cupcakes from the cavities. Transfer them to a wire rack to cool completely before decorating.
- Decorate and enjoy: Once the cupcakes have cooled, you can unleash your creativity and decorate them with frosting, sprinkles, or any other toppings of your choice. Then, they’re ready to be enjoyed!
Remember to follow the specific instructions provided by your mini cupcake maker’s manufacturer for the best results.
How long do you cook cupcakes in a mini cupcake maker?
The cooking time for cupcakes in a mini cupcake maker can vary depending on the specific model and recipe you are using. However, as a general guideline, mini cupcakes typically take around 5 to 10 minutes to cook in a mini cupcake maker.
To determine the exact cooking time for your mini cupcakes, it’s best to refer to the instructions provided by the manufacturer of your specific mini cupcake maker. They may provide recommended baking times based on the type of batter and desired level of doneness.
Additionally, it’s important to keep an eye on the cupcakes as they bake. Check for visual cues such as the cupcakes rising and turning golden brown, and use a toothpick or cake tester to check for doneness. Insert the toothpick into the center of a cupcake, and if it comes out clean or with a few moist crumbs, the cupcakes are ready.
Remember that baking times can vary, so it’s always a good idea to start checking for doneness a couple of minutes before the recommended baking time and adjust accordingly. Over-baking the cupcakes can result in dry or overly firm texture, so it’s better to err on the side of slightly under-baking if unsure.
With a little practice and observation, you’ll soon become familiar with the optimal cooking time for mini cupcakes in your specific mini cupcake maker.
How much batter is in a mini cupcake?
The amount of batter required for a mini cupcake can vary depending on the size of the cupcake cavity in your mini cupcake maker and the desired final size of the cupcake. As a general guideline, mini cupcakes typically require around 1 to 2 tablespoons of batter per cavity.
To determine the exact amount of batter needed, you can do a quick test by filling one cavity with batter using a measuring spoon or small scoop. If the batter fills the cavity to about 2/3 or 3/4 full, it should be the right amount. Adjust the amount of batter accordingly for each cavity to ensure consistent-sized mini cupcakes.
It’s essential not to overfill the cavities, as the cupcakes will rise and expand during baking. Leaving some space for the cupcakes to expand will help them maintain their shape and prevent overflowing or muffin tops.
Keep in mind that the specific instructions provided by your mini cupcake maker’s manufacturer may also provide guidance on the recommended amount of batter per cavity. It’s always a good idea to follow those instructions for the best results.
Experimenting and finding the right amount of batter for your mini cupcakes may take some trial and error, but with practice, you’ll be able to gauge the perfect amount for perfectly-sized mini cupcakes.
How much cake mix for mini cupcake maker?
The amount of cake mix needed for a mini cupcake maker can vary depending on the size of the cupcakes and the specific brand or recipe you are using. However, as a general guideline, you can use about 1 to 2 tablespoons of cake mix per mini cupcake.
To determine the exact amount of cake mix needed, you can follow these steps:
- Check the instructions on the cake mix package: Most cake mix packages provide instructions for baking in regular-sized cupcakes or cakes. Look for the recommended amount of batter or servings listed.
- Scale down the measurements: Since mini cupcakes are smaller than regular-sized cupcakes, you’ll need to scale down the measurements accordingly. A typical guideline is to use about 1/4 to 1/3 of the amount of batter recommended for regular cupcakes.
- Adjust the consistency: Depending on the specific cake mix you’re using, you may need to adjust the consistency of the batter. Some cake mixes may require adding additional liquid or adjusting the ratio of wet and dry ingredients to ensure the batter is not too thick or too runny.
- Fill the cavities: Using a spoon or small scoop, fill each cavity of the mini cupcake maker with the prepared cake batter. Fill them to about 2/3 or 3/4 full, leaving some space for the cupcakes to rise during baking.
It’s important to note that the instructions provided by your specific mini cupcake maker and the cake mix package should always be followed for the best results. They may offer specific recommendations for the amount of batter needed and any adjustments required.
Experimenting with different amounts of cake mix and adjusting as needed will help you find the perfect balance for your mini cupcakes in your specific mini cupcake maker.
What temperature do you bake in mini cupcake maker?
The specific temperature for baking in a mini cupcake maker can vary depending on the model and brand you are using. However, most mini cupcake makers operate at a temperature range of approximately 300°F to 350°F (150°C to 175°C).
It’s important to follow the instructions provided by the manufacturer of your mini cupcake maker, as they will typically provide the recommended baking temperature for optimal results. The temperature setting may also depend on the recipe or type of batter you are using.
If your mini cupcake maker doesn’t have adjustable temperature settings, it will generally have a pre-set temperature that is appropriate for baking mini cupcakes. In this case, it’s important to preheat the cupcake maker according to the manufacturer’s instructions to ensure even and consistent baking.
As a general guideline, start with a lower temperature within the recommended range and adjust as needed based on the appearance and doneness of the cupcakes. Keep an eye on the cupcakes as they bake and check for visual cues such as rising, browning, and firmness. If the cupcakes are browning too quickly or not baking evenly, you can lower the temperature slightly.
Remember that baking times and temperatures may vary, so it’s always a good idea to start with the recommended settings and make adjustments as needed based on your specific mini cupcake maker and recipe.
How long do mini cupcakes stay fresh?
The freshness of mini cupcakes can vary depending on several factors, including the ingredients used, storage conditions, and the specific recipe. In general, mini cupcakes can stay fresh for 2 to 3 days when stored properly.
To maximize the freshness and shelf life of mini cupcakes, here are some tips:
- Proper Storage: Store the mini cupcakes in an airtight container or a cake carrier to protect them from exposure to air and moisture. This helps prevent them from drying out or becoming stale.
- Room Temperature: Keep the mini cupcakes at room temperature in a cool and dry place, away from direct sunlight and heat sources. Avoid storing them in the refrigerator unless the recipe specifically calls for it, as refrigeration can dry out the cupcakes.
- Frosting Considerations: If your mini cupcakes are frosted, it’s important to note that certain types of frosting, such as cream cheese or perishable fillings, may require refrigeration. Follow the specific instructions for storing frosted mini cupcakes to maintain their freshness and prevent spoilage.
- Quality Ingredients: Using fresh and high-quality ingredients in your mini cupcake recipe can contribute to their overall freshness and taste. Be mindful of the expiration dates of ingredients like eggs, dairy, and leavening agents.
- Freeze for Longer Storage: If you want to extend the shelf life of your mini cupcakes, you can freeze them. Place the cupcakes in an airtight container or freezer bags and label them with the date. They can typically be stored in the freezer for up to 2 to 3 months. Thaw them at room temperature before serving.
It’s important to note that as time passes, the texture and taste of mini cupcakes may start to degrade. While they may still be safe to consume after a few days, they may not have the same freshness and quality as when they were freshly baked. It’s always best to consume mini cupcakes within a few days of baking for the best taste and texture.
Mini cupcake maker recipes
Here’s a simple and delicious recipe for mini cupcakes that you can make using a mini cupcake maker:
Classic Vanilla Mini Cupcakes:
Ingredients:
- 1 ¼ cups all-purpose flour
- 1 teaspoon baking powder
- ¼ teaspoon salt
- ½ cup unsalted butter, softened
- 1 cup granulated sugar
- 2 large eggs
- 1 teaspoon vanilla extract
- ½ cup milk
Instructions:
- Preheat your mini cupcake maker according to the manufacturer’s instructions.
- In a bowl, whisk together the flour, baking powder, and salt. Set aside.
- In a separate bowl, cream together the softened butter and sugar until light and fluffy.
- Add the eggs, one at a time, beating well after each addition. Stir in the vanilla extract.
- Gradually add the dry ingredients to the butter mixture, alternating with the milk. Begin and end with the dry ingredients, mixing until just combined. Be careful not to overmix.
- Spoon the batter into the wells of the preheated mini cupcake maker, filling each about two-thirds full.
- Close the lid of the cupcake maker and bake according to the manufacturer’s instructions, usually around 4-5 minutes. The cupcakes are done when they are golden brown and a toothpick inserted into the center comes out clean.
- Carefully remove the mini cupcakes from the maker and transfer them to a wire rack to cool completely.
- Once cooled, you can frost the mini cupcakes with your favorite frosting or decorate them as desired.
Enjoy your homemade mini cupcakes!
Note: This recipe can be easily customized by adding different flavors, extracts, or mix-ins to the batter. You can also experiment with various frostings and toppings to create a variety of mini cupcake flavors.
Do mini cupcakes need to be refrigerated?
Mini cupcakes do not necessarily need to be refrigerated unless the recipe calls for it or the frosting is perishable. Generally, if the mini cupcakes will be consumed within a day or two, they can be stored at room temperature in an airtight container.
However, if you live in a hot and humid climate, it may be better to store them in the refrigerator to prevent spoilage. It is also important to note that cream cheese frosting or any other frosting made with perishable ingredients should be refrigerated.
Final Thoughts
Mini cupcake makers offer a convenient and efficient way to make small batches of cupcakes, perfect for parties or small gatherings. With the right recipes and techniques, mini cupcakes can be just as delicious and impressive as their full-size counterparts.
Whether you prefer classic flavors like vanilla and chocolate or more creative combinations like lemon-blueberry or pumpkin spice, there are countless mini cupcake recipes to choose from. Just be sure to follow the instructions for your specific mini cupcake maker and enjoy the delicious treats you create!
Related Posts
How do you use a mini cake pop maker?
A mini cake pop maker is a compact kitchen appliance...
Read MoreWhy Trust Us
You will find what you are looking for at Jody's Bakery. From classic to luxury brands, you'll find both. We will help you to select appliances that fit your needs, budget and lifestyle. Whether you want to stop by to learn more — or plan to make a major purchase — we’ll treat you like family and assist you every step of the way. Shop with us today to receive friendly and experienced help along the way.





I found this article to be both engaging and enlightening. The points made were compelling and well-supported. Let’s talk more about this. Click on my nickname for more engaging content!