An Introduction to Home Pressure Canning
Home pressure canning is a popular method for preserving food at home. It involves using a specialized pressure canner to process food in jars at a high temperature and pressure, which kills harmful bacteria and creates a vacuum seal that helps to keep the food fresh.
The process of pressure canning is different from traditional boiling water canning, which is used for preserving high-acid foods such as fruits, pickles, and jams. Pressure canning is necessary for preserving low-acid foods such as vegetables, meats, and soups, which are more susceptible to bacterial growth and require a higher temperature for preservation.
To get started with home pressure canning, you will need a pressure canner, canning jars, and lids. It’s important to use high-quality jars and lids that are specifically designed for canning, as they are designed to withstand the high heat and pressure of the canning process.
Before you begin, it’s important to follow safe canning practices to ensure the safety and quality of your canned goods. This includes properly sterilizing your jars and equipment, using tested and approved recipes, and following recommended processing times and pressures based on your altitude.
Some popular foods to pressure can include tomato sauce, green beans, carrots, chicken stock, and beef stew. Canned foods can be stored in a cool, dry place for up to one year, providing a convenient and delicious source of food for your family.
Overall, home pressure canning is a rewarding and practical way to preserve food at home. With the right equipment and knowledge, you can enjoy the benefits of fresh, homemade canned goods all year round.
What is Pressure Canning?
Pressure canning is a method of preserving food in jars by using high heat and pressure to kill bacteria and create a vacuum seal. It is typically used for preserving low-acid foods such as vegetables, meats, and soups, which are more susceptible to bacterial growth and require a higher temperature for preservation.
The pressure canning process involves placing prepared food into sterilized jars and sealing them with canning lids. The jars are then placed in a specialized pressure canner that uses steam and pressure to heat the contents of the jars to a temperature of 240-250°F (116-121°C) for the recommended processing time based on the type of food being canned.
The high temperature and pressure in the canner kill harmful bacteria and create a vacuum seal that helps to keep the food fresh. The sealed jars can then be stored in a cool, dry place for up to one year, providing a convenient and delicious source of food for your family.
It’s important to follow safe canning practices when pressure canning to ensure the safety and quality of your canned goods. This includes properly sterilizing your jars and equipment, using tested and approved recipes, and following recommended processing times and pressures based on your altitude.
Overall, pressure canning is a great way to preserve food at home and can provide a cost-effective and convenient source of food throughout the year.
Which Food Needs to Be Pressure Canned
Low-acid foods, which have a pH level greater than 4.6, need to be pressure canned to ensure their safety and preservation. This is because low-acid foods provide a favorable environment for the growth of harmful bacteria, such as Clostridium botulinum, which can cause botulism.
Examples of low-acid foods that need to be pressure canned include:
- Vegetables: such as green beans, corn, peas, carrots, and potatoes.
- Meat: such as beef, pork, and poultry.
- Seafood: such as fish, shellfish, and crustaceans.
- Soups and stews: that contain meat, vegetables, or beans.
- Tomatoes: if they are not acidified or combined with high-acid ingredients such as lemon juice or vinegar.
In contrast, high-acid foods with a pH of 4.6 or lower, such as fruits, pickles, and acidic tomato products, can be safely canned using the boiling water bath method, which involves submerging the filled jars in boiling water for a specified amount of time.
It’s important to follow recommended processing times and pressures based on the type of food being canned and your altitude. Using tested and approved recipes and following safe canning practices can help ensure the safety and quality of your canned goods.
What Is So Appealing About Pressure Canning?
There are several reasons why pressure canning is appealing to many people:
- Longer shelf life: Pressure canning can significantly extend the shelf life of food by preventing bacterial growth and spoilage. Canned food can last up to one year or even longer if stored properly.
- Cost-effective: Pressure canning is a cost-effective way to preserve food, especially if you have access to fresh produce from your garden or local farmers’ market.
- Convenience: Canned food is convenient and can be easily stored and transported. It can also be used in a variety of recipes, making meal preparation quicker and easier.
- Preserves nutrients: Pressure canning can help preserve the nutrients in food, as it involves cooking at high heat for a shorter period of time compared to other preservation methods like freezing or dehydrating.
- Control over ingredients: Pressure canning allows you to control the ingredients in your food, which is especially important if you have dietary restrictions or allergies.
- Sustainability: Canning is a sustainable practice that reduces food waste and promotes a more self-sufficient lifestyle.
Overall, pressure canning is a popular and practical method for preserving food at home, and it offers many benefits to those who enjoy home preservation and cooking.
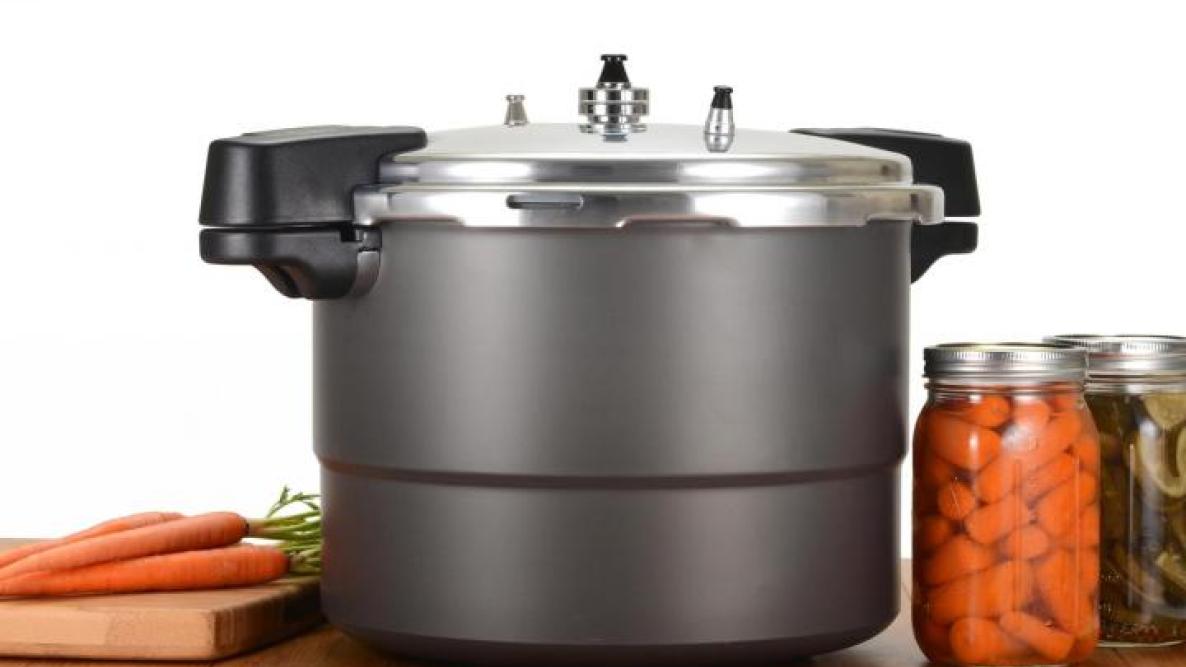
Pressure Canning Supplies
To get started with pressure canning, you will need a few essential supplies. Here are some of the basic pressure canning supplies:
- Pressure canner: A specialized pot designed for pressure canning, with a locking lid and a pressure gauge or weighted regulator.
- Canning jars: Glass jars specifically designed for canning, with lids and bands that create an airtight seal.
- Canning funnel: A funnel designed for easy filling of jars without spilling.
- Jar lifter: A tool that helps to lift hot jars in and out of the canner safely.
- Lid lifter: A magnet-tipped tool for lifting canning lids out of hot water.
- Bubble remover and headspace tool: A tool used to remove air bubbles and ensure the correct amount of headspace in the jars.
- Canning rack: A rack that fits inside the canner to keep jars off the bottom of the pot and allow for even heat distribution.
- Kitchen timer: A timer to ensure that the processing time is accurate.
- Clean cloths or towels: For wiping jars and lids, and for cleaning up spills.
It’s important to use high-quality, food-grade canning supplies that are specifically designed for canning to ensure the safety and quality of your canned goods. Following safe canning practices and using tested and approved recipes can also help ensure the safety and quality of your canned foods.
A Caution for Canners
When pressure canning, it’s important to follow safe canning practices to prevent foodborne illness. Here are some important cautions to keep in mind:
- Use tested and approved recipes: Always use tested and approved canning recipes from reputable sources, as these have been tested to ensure safe processing times and pressures.
- Follow processing times and pressures: Always follow the recommended processing times and pressures for your altitude and the type of food being canned. Over-processing or under-processing can lead to spoilage or bacterial growth.
- Properly sterilize jars and equipment: Always sterilize your jars, lids, and equipment before canning to prevent the growth of harmful bacteria. This can be done by boiling the jars and lids in water or using a dishwasher with a sanitizing cycle.
- Check jars for defects: Inspect jars for cracks or defects before canning, as these can prevent a proper seal from forming.
- Use appropriate canning methods: Use the appropriate canning method for the type of food being canned. Low-acid foods should always be pressure canned, while high-acid foods can be safely canned using the boiling water bath method.
- Avoid cross-contamination: Keep your work area clean and avoid cross-contamination by washing your hands, using clean utensils and equipment, and separating raw and cooked foods.
- Store canned goods properly: Store canned goods in a cool, dry place away from sunlight and heat sources. Always check for signs of spoilage before consuming canned foods.
By following safe canning practices and using approved recipes, you can help ensure the safety and quality of your canned goods.
Tips For Preparing Delicious Canned Foods
Here are some tips for preparing delicious canned foods:
- Choose high-quality produce: Select fresh, ripe produce that is free from blemishes and bruises. Use produce that is in season and locally grown for the best flavor.
- Use approved recipes: Use tested and approved canning recipes from reputable sources to ensure safe processing times and pressures. Don’t modify recipes, as this can affect the safety and quality of the final product.
- Use proper canning techniques: Use the appropriate canning method for the type of food being canned. Pressure can low-acid foods, such as meats, seafood, and most vegetables, while high-acid foods, such as fruits, jams, and pickles, can be safely canned using the boiling water bath method.
- Adjust seasonings: Adjust the seasonings in your recipe to suit your taste preferences. Don’t be afraid to add spices, herbs, or other flavorings to enhance the flavor of your canned goods.
- Remove air bubbles: Use a bubble remover or headspace tool to remove air bubbles from the jars before processing. This can help ensure that the jars are properly filled and will seal correctly.
- Use fresh lids: Always use new, fresh canning lids when canning. Used or damaged lids may not seal properly, which can lead to spoilage.
- Label and date jars: Label each jar with the name of the contents and the date it was canned. This can help you keep track of your inventory and ensure that you use your canned goods before they expire.
By following these tips and using safe canning practices, you can prepare delicious canned foods that are safe to eat and will last for a long time.
A Step-by-Step Guide to Pressure Canning
Here is a step-by-step guide to pressure canning:
- Prepare your equipment: Wash your pressure canner, jars, and lids with hot, soapy water and rinse well. Inspect the jars for cracks or defects and discard any that are damaged. Set the jars, lids, and bands aside.
- Prepare your food: Prepare your food according to your recipe, cutting it into the desired size and cooking it if necessary.
- Fill your jars: Using a canning funnel, ladle your hot food into the jars, leaving the recommended amount of headspace. Use a bubble remover or headspace tool to remove air bubbles from the jars.
- Wipe the rims: Use a clean, damp cloth to wipe the rims of the jars to ensure a good seal.
- Place lids and bands: Place a new, clean lid on each jar and secure it with a band, tightening only until finger-tight.
- Load the canner: Place the canning rack in the bottom of the canner and add the recommended amount of water according to your canner’s instructions. Load the jars onto the rack, making sure they are not touching each other or the sides of the canner.
- Close and lock the lid: Place the lid on the canner and lock it in place. Follow your canner’s instructions for bringing the pressure up to the recommended level.
- Process the jars: Once the canner has reached the recommended pressure, begin timing the processing time according to your recipe and altitude. Keep the pressure at a consistent level throughout the processing time.
- Turn off the heat: Once the processing time is complete, turn off the heat and let the canner cool down naturally. Don’t remove the lid until the pressure has dropped to zero.
- Remove the jars: Once the pressure has dropped to zero and the canner has cooled down, carefully remove the lid and use a jar lifter to remove the jars from the canner. Place the jars on a towel to cool and check for proper seals.
By following these steps and using safe canning practices, you can safely and successfully pressure can your own food at home.
More Canning Information
Here is some more information about canning:
- Canning methods: There are two main canning methods: boiling water bath and pressure canning. Boiling water bath canning is suitable for high-acid foods such as fruits, pickles, and most tomatoes, while pressure canning is required for low-acid foods such as vegetables, meats, and seafood.
- Altitude adjustments: The processing time and pressure required for canning may need to be adjusted based on your altitude. Check your recipe for altitude adjustments or consult with your local extension office for guidance.
- Jar size: Use the appropriate jar size for your recipe, and make sure to adjust the processing time and pressure if you are using a different jar size than what is recommended in the recipe.
- Storage: Store your canned goods in a cool, dark place away from sunlight and extreme temperatures. Check the seals on your jars periodically, and discard any jars that show signs of spoilage.
- Safe canning practices: It is important to follow safe canning practices to ensure the safety and quality of your canned goods. Use tested and approved recipes, follow processing times and pressures accurately, use fresh lids and clean jars, and inspect jars for cracks or defects before use.
- Reusing jars and lids: While jars can be reused, lids should not be reused for canning. Lids are designed for a one-time use only and may not create a safe seal if reused.
- Canning with electric pressure cookers: Some electric pressure cookers have a canning function, but not all are suitable for pressure canning. Check with the manufacturer’s instructions before attempting to can in an electric pressure cooker.
By following these guidelines and using safe canning practices, you can enjoy the benefits of home-canned foods that are both delicious and safe to eat.
Related Posts
Why Trust Us
You will find what you are looking for at Jody's Bakery. From classic to luxury brands, you'll find both. We will help you to select appliances that fit your needs, budget and lifestyle. Whether you want to stop by to learn more — or plan to make a major purchase — we’ll treat you like family and assist you every step of the way. Shop with us today to receive friendly and experienced help along the way.


… [Trackback]
[…] Info to that Topic: jodysbakery.com/pressure-canning-a-guide-for-beginners-and-recipes/ […]
… [Trackback]
[…] Find More Information here on that Topic: jodysbakery.com/pressure-canning-a-guide-for-beginners-and-recipes/ […]
… [Trackback]
[…] Find More Info here to that Topic: jodysbakery.com/pressure-canning-a-guide-for-beginners-and-recipes/ […]
… [Trackback]
[…] Here you can find 59486 additional Info on that Topic: jodysbakery.com/pressure-canning-a-guide-for-beginners-and-recipes/ […]
… [Trackback]
[…] Find More on that Topic: jodysbakery.com/pressure-canning-a-guide-for-beginners-and-recipes/ […]
… [Trackback]
[…] Read More on to that Topic: jodysbakery.com/pressure-canning-a-guide-for-beginners-and-recipes/ […]
… [Trackback]
[…] Find More on to that Topic: jodysbakery.com/pressure-canning-a-guide-for-beginners-and-recipes/ […]
… [Trackback]
[…] There you can find 51390 additional Information on that Topic: jodysbakery.com/pressure-canning-a-guide-for-beginners-and-recipes/ […]
… [Trackback]
[…] Read More on that Topic: jodysbakery.com/pressure-canning-a-guide-for-beginners-and-recipes/ […]
… [Trackback]
[…] Information to that Topic: jodysbakery.com/pressure-canning-a-guide-for-beginners-and-recipes/ […]
… [Trackback]
[…] Find More on that Topic: jodysbakery.com/pressure-canning-a-guide-for-beginners-and-recipes/ […]
… [Trackback]
[…] Find More here to that Topic: jodysbakery.com/pressure-canning-a-guide-for-beginners-and-recipes/ […]
… [Trackback]
[…] Find More Information here on that Topic: jodysbakery.com/pressure-canning-a-guide-for-beginners-and-recipes/ […]