A Halloween pumpkin cake is a delightful and festive dessert...
Read More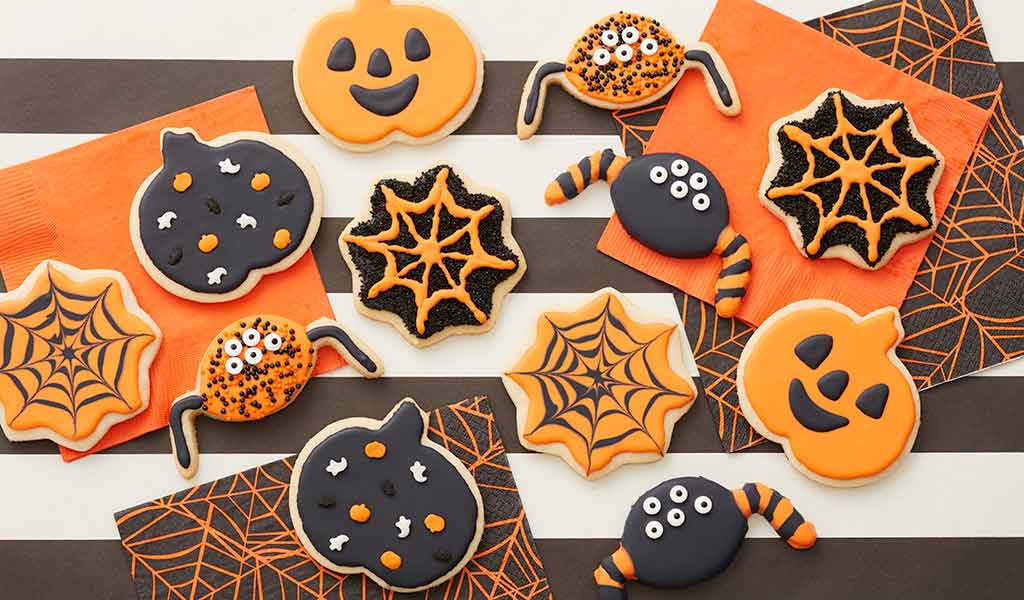
Halloween cookies are delicious and creatively designed treats enjoyed during the Halloween season. These cookies come in various spooky shapes and vibrant colors, often resembling classic Halloween symbols like pumpkins, ghosts, bats, and witches. Baked with love and decorated with icing, these cookies are not only delightful to eat but also serve as festive decorations at Halloween parties and events.
Whether they’re homemade creations or store-bought delights, Halloween cookies add a sweet and playful touch to the spooky festivities, making them a favorite treat among both kids and adults during the haunting season.
What equipment is used in Halloween cookies?
To make creative and spooky Halloween cookies, you can use various equipment and tools to achieve different shapes, decorations, and effects. Here are some common items used in Halloween cookie baking and decorating:
- Cookie Cutters: Halloween-themed cookie cutters come in shapes like pumpkins, ghosts, bats, witches, and skulls. These cutters help you create cookies in specific Halloween shapes.
- Rolling Pin: A rolling pin is used to roll out the cookie dough to a uniform thickness before cutting out shapes.
- Baking Sheets: Baking sheets lined with parchment paper or silicone baking mats provide a non-stick surface for baking cookies.
- Cookie Scoop: A cookie scoop helps you portion out the cookie dough evenly, ensuring uniform-sized cookies.
- Piping Bags and Tips: If you plan to decorate your cookies with intricate designs, royal icing, or frosting, piping bags and various tips allow for detailed and precise decorating.
- Food Coloring: Gel or liquid food coloring allows you to tint your icing or dough in different Halloween-themed colors.
- Edible Decorations: Various edible decorations like sprinkles, colored sugars, edible glitter, and candy eyes can be used to add texture and detail to your cookies.
- Paint Brushes: Food-safe paint brushes can be used to apply food color or edible dust for artistic effects.
- Stencil: Stencils can help you create intricate designs or patterns on your cookies using powdered sugar or cocoa powder.
- Cooling Racks: Cooling racks allow cookies to cool down evenly and quickly after baking.
- Edible Markers: These markers are specifically designed for food use and can be used to draw intricate details directly onto the cookies.
- Molds: Silicone molds can be used for 3D or detailed cookie decorations.
- Texture Tools: Tools like embossing mats or textured rolling pins can add interesting textures to your cookies.
- Oven Thermometer: An oven thermometer ensures that your oven is at the correct temperature for baking, as ovens can sometimes have inaccurate temperature readings.
Remember that the specific equipment you need will depend on the type of Halloween cookies you plan to make. Get creative and have fun experimenting with different tools and techniques to make your Halloween cookies uniquely spooky and delicious!
How to make Halloween cookies
Recipe: Spooky Halloween Cookies
Ingredients:
- 2 3/4 cups all-purpose flour
- 1 teaspoon baking soda
- 1/2 teaspoon baking powder
- 1 cup unsalted butter, softened
- 1 1/2 cups white sugar
- 1 egg
- 1 teaspoon vanilla extract
- Food coloring (orange, black, purple, green)
- Halloween-themed cookie cutters (pumpkins, bats, ghosts, etc.)
- Icing and edible decorations for decorating
Instructions:
- Preheat Your Oven: Preheat your oven to 375°F (190°C) and line a baking sheet with parchment paper.
- Prepare the Dry Ingredients: In a medium bowl, whisk together the flour, baking soda, and baking powder. Set aside.
- Cream the Butter and Sugar: In a large bowl, cream together the softened butter and sugar until smooth.
- Add Egg and Vanilla: Beat in the egg and vanilla until well blended.
- Gradually Add Dry Ingredients: Gradually add the dry ingredients to the wet ingredients, mixing until a soft dough forms.
- Divide and Color the Dough: Divide the dough into separate portions based on the number of colors you want to use. Add a few drops of food coloring to each portion and knead until the color is evenly distributed.
- Roll and Cut: On a floured surface, roll out each colored dough portion to about 1/4-inch thickness. Use Halloween-themed cookie cutters to cut out shapes from the dough.
- Bake: Place the cut-out cookies onto the prepared baking sheet and bake in the preheated oven for 8-10 minutes, or until the edges are lightly golden. Remove from the oven and let them cool on the baking sheet for a few minutes before transferring to a wire rack to cool completely.
- Decorate: Once the cookies are completely cooled, use icing and edible decorations to create spooky and fun designs on your Halloween cookies. Let the icing set before serving.
Enjoy your homemade Halloween cookies at spooky parties or share them with friends and family for a delightful Halloween treat!
Best topping for Halloween cookies
The best toppings for Halloween cookies depend on your preference and the theme you want to achieve. Here are some popular and creative topping ideas for Halloween cookies:
- Royal Icing: Use royal icing to create intricate and detailed designs on your cookies. You can pipe ghosts, pumpkins, spiders, or other spooky creatures.
- Colored Sprinkles: Choose Halloween-themed sprinkles like bats, pumpkins, or skulls to add a festive touch to your cookies. Sprinkle them over icing while it’s still wet.
- Edible Glitter: Give your cookies a magical and sparkly look by using edible glitter in orange, black, or purple colors.
- Candy Eyes: Candy eyes are a fun and easy way to make your cookies look like monsters. Stick them onto the icing for a playful effect.
- Chocolate Ganache: Dip your cookies halfway into smooth chocolate ganache and let it set. You can then add additional decorations like colored drizzles or sprinkles.
- Colored Icing: Use colored icing to create vibrant designs. You can make orange icing for pumpkins, green for witches, or black for spooky silhouettes.
- Marshmallow Fondant: Roll out marshmallow fondant and cut it into shapes to place on top of your cookies. Fondant allows for intricate designs and a smooth finish.
- Caramel or White Chocolate Drizzle: Drizzle melted caramel or white chocolate over your cookies for an elegant and tasty decoration.
- Crushed Cookies: Crushed chocolate cookies or graham crackers can be sprinkled over icing to create a textured and flavorful topping.
- Toasted Coconut: Toasted coconut flakes can resemble shredded zombie skin or hay, making them perfect for Halloween-themed cookies.
Feel free to mix and match these toppings to create a variety of Halloween cookies that will impress your guests and trick-or-treaters!
How to store Halloween cookies
Storing Halloween cookies properly is essential to maintain their freshness and flavor. Here are some steps to store your Halloween cookies:
- Cool Completely: Allow your Halloween cookies to cool completely on wire racks before storing them. If you store warm cookies, they can create condensation, leading to sogginess.
- Layering: If you need to stack the cookies, place a sheet of parchment paper between each layer. This prevents the cookies from sticking together and preserves their shapes and decorations.
- Airtight Container: Store the cookies in an airtight container. You can use plastic containers with tight-sealing lids or metal tins. The airtight seal prevents moisture and air from getting in, keeping the cookies fresh for a longer time.
- Avoid Mixing Flavors: If you’re storing different flavored cookies, it’s best to store them separately or use individual airtight containers for each flavor. This prevents the flavors from blending together.
- Room Temperature: Most cookies are fine to be stored at room temperature for a few days. However, if your cookies have perishable fillings like cream or custard, they should be refrigerated.
- Refrigeration: If your Halloween cookies have ingredients like cream cheese or fresh fruit fillings, store them in the refrigerator. Place a piece of wax paper between layers to prevent sticking.
- Freezing: If you want to store your Halloween cookies for an extended period, they can be frozen. Freeze cookies in a single layer on a baking sheet until solid, then transfer them to an airtight container or freezer-safe bag. They can be stored in the freezer for several weeks. Thaw cookies in the refrigerator or at room temperature before serving.
- Avoid Moisture: Keep the container in a cool, dry place. Avoid storing cookies near the stove, sink, or other sources of moisture and heat.
By following these steps, you can enjoy your Halloween cookies over several days or even weeks while maintaining their freshness and taste.
Related Posts
Pillsbury Halloween Cookies
Pillsbury Halloween Cookies, offered by Pillsbury, a well-known brand in...
Read MoreWhy Trust Us
You will find what you are looking for at Jody's Bakery. From classic to luxury brands, you'll find both. We will help you to select appliances that fit your needs, budget and lifestyle. Whether you want to stop by to learn more — or plan to make a major purchase — we’ll treat you like family and assist you every step of the way. Shop with us today to receive friendly and experienced help along the way.


