A stand mixer is a versatile kitchen appliance that can...
Read More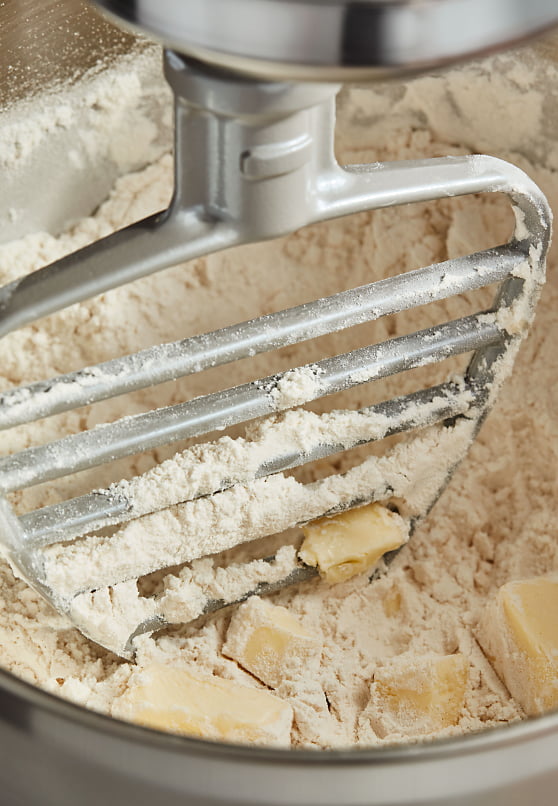
Pie crust is an essential component of many pies and tarts. While making pie crust from scratch can be time-consuming and requires a lot of effort, using a stand mixer can make the process much easier and less labor-intensive.
A stand mixer can help you create a perfectly flaky and tender crust by mixing the ingredients thoroughly and evenly. In this guide, we will explore the steps involved in making pie crust in a stand mixer and some tips for achieving the perfect crust every time.
What is best better for pie crust?
When it comes to making pie crust, there are different methods and techniques that work best for different people, depending on their preference and the recipe they are using. Some people prefer to make pie crust by hand, while others prefer to use a stand mixer, food processor, or a hand-held mixer.
If you are looking for a flaky and tender pie crust, many bakers recommend making it by hand using a pastry cutter or two knives to cut the butter or shortening into the flour mixture until it resembles coarse meal. This method allows you to control the size of the butter or shortening pieces and helps ensure that the pie crust stays flaky.
However, if you prefer a quicker and easier method, a stand mixer can be a great option. You can use the paddle attachment to mix the flour and fat together until they resemble coarse meal, then add the liquid ingredients and mix until the dough comes together. The dough hook attachment can be used for kneading the dough.
Ultimately, the best method for making pie crust depends on your personal preference and the recipe you are using. Experiment with different techniques and find the one that works best for you.
Is it better to put pie crust in a food processor or stand mixer?
Both food processors and stand mixers can be used to make pie crusts, and which one is better depends on personal preference and the specific recipe being used.
A food processor is great for quickly cutting cold butter into the flour mixture, creating a crumbly texture. However, it can be easy to over-process the dough, resulting in a tough crust.
A stand mixer, on the other hand, is better for gently combining the ingredients without overworking the dough. It’s also great for making larger batches of dough. However, it may take a little longer to mix the ingredients together compared to using a food processor.
Ultimately, the choice between a food processor and a stand mixer comes down to personal preference and the specific recipe being used.
What is the number 2 most important thing when making pie crust?
The number 2 most important thing when making pie crust is to keep the ingredients and equipment as cold as possible. This is because cold ingredients and equipment help to prevent the formation of gluten, which can make the crust tough, and also keep the fat in the dough from melting too quickly, resulting in a flakier texture.
What is a trick to making a good pie crust?
One trick to making a good pie crust is to keep all of your ingredients as cold as possible. This helps to keep the fat (butter, shortening, etc.) from melting too quickly and blending too thoroughly with the flour, which can result in a tough crust. Keeping the ingredients cold also helps to create those desirable flaky layers in the crust. Another trick is to work the dough as little as possible once the liquid has been added, as overworking can also lead to a tough crust.
What type of mixer is used for pie crust?
A stand mixer is typically used for making pie crust. Stand mixers are designed to handle heavy and dense doughs, which are necessary for making pie crust. They usually come with a dough hook attachment that is perfect for kneading and mixing pie crust dough. However, some people prefer to use a food processor or a hand-held mixer to make pie crust, depending on personal preference and the recipe they are using.
Benefits of making pie crust in a stand mixer
There are several benefits to making pie crust in a stand mixer, including:
- Time-saving: Making pie crust by hand can be a time-consuming process, especially if you are making a large batch. A stand mixer can save you time by mixing the dough quickly and efficiently.
- Consistency: A stand mixer can help you achieve a consistent texture and appearance for your pie crust. The mixer will ensure that all the ingredients are evenly distributed, resulting in a uniform dough.
- Less effort: Mixing pie dough by hand can be tiring and laborious, especially if you need to mix it for a long time. A stand mixer can take the effort out of the process, allowing you to mix the dough effortlessly.
- Easy to control: A stand mixer allows you to easily control the speed and intensity of the mixing. This means you can adjust the mixing according to the recipe and the type of pie crust you are making.
- Hands-free: Using a stand mixer to make pie crust means you can do other things while the mixer is working. This can be especially useful if you are preparing multiple dishes at once.
Overall, making pie crust in a stand mixer can save you time and effort, while also helping you achieve a consistent and uniform result.
Which stand mixer attachment for pie crust?
The paddle attachment is the most commonly used attachment for making pie crust in a stand mixer. This attachment is designed to mix ingredients together and is perfect for combining butter or shortening with flour and other dry ingredients to create a flaky and tender crust.
Some stand mixers also come with a dough hook attachment that can be used for mixing and kneading dough, but it may not be the best option for making pie crust as it can overwork the dough and make it tough.
How To Make Pie Crust In A Stand Mixer
Here is a step-by-step guide on how to make pie crust in a stand mixer:
Ingredients:
- 2 1/2 cups all-purpose flour
- 1 tablespoon granulated sugar
- 1 teaspoon salt
- 1 cup unsalted butter, cold and cut into small pieces
- 1/4 to 1/2 cup ice water
Instructions:
- In the bowl of a stand mixer, combine the flour, sugar, and salt. Mix until well combined.
- Add the cold butter pieces to the bowl and mix on low speed using the paddle attachment until the mixture resembles coarse crumbs.
- Slowly add the ice water, a tablespoon at a time, while continuing to mix on low speed. Add just enough water to bring the dough together into a ball.
- Stop mixing as soon as the dough comes together, being careful not to overwork the dough.
- Turn the dough out onto a lightly floured surface and shape it into a disc.
- Cover the dough with plastic wrap and refrigerate for at least 30 minutes, or up to 2 days.
- When ready to use, remove the dough from the refrigerator and let it sit at room temperature for 5-10 minutes to soften slightly.
- Roll out the dough on a lightly floured surface to the desired thickness and shape.
- Use the dough to line a pie dish, trim the edges, and decorate as desired.
Note: Depending on the recipe and the desired outcome, you may need to blind bake the crust before adding the filling. Follow the recipe instructions for baking times and temperatures.
How do I make my pie crust more crispy?
To make your pie crust more crispy, here are a few tips you can follow:
- Use cold ingredients: Start with cold butter, shortening, or lard and ice-cold water. This will help to keep the dough cool and prevent it from becoming greasy.
- Don’t overwork the dough: Mix the dough until it just comes together. Overworking the dough can develop too much gluten, resulting in a tough crust.
- Use a pie shield: If you find that the edges of your pie crust are browning too quickly, cover them with a pie shield made of aluminum foil or a silicone ring.
- Pre-bake the crust: For custard or cream pies, blind-bake the crust before adding the filling. This will help to crisp up the crust and prevent it from becoming soggy.
- Brush with egg wash: Brushing the top of the crust with a beaten egg before baking will help to give it a golden, crispy finish.
- Bake at a high temperature: Start baking the pie at a high temperature (around 425°F) for the first 10-15 minutes, then reduce the temperature to 375°F and continue baking until the crust is golden brown.
By following these tips, you should be able to achieve a crispy, flaky pie crust every time.
How long should you knead pie crust in stand mixer?
When kneading pie crust in a stand mixer, the amount of time needed will depend on the recipe and the type of pie crust you are making. Generally, it’s recommended to knead the dough until it comes together and forms a ball, but you don’t want to overwork the dough as this can result in a tough crust.
As a general rule of thumb, pie crust dough should be kneaded for no more than 2-3 minutes in a stand mixer. However, you should refer to the specific recipe you are using for guidance on the amount of time needed for kneading. If the recipe doesn’t specify the kneading time, start with 1-2 minutes and check the dough frequently to avoid over-kneading.
Keep in mind that the goal of kneading is to distribute the fat evenly and create a cohesive dough, so it’s important to pay attention to the dough’s texture and appearance rather than the exact amount of time needed. Once the dough has come together and formed a ball, it’s ready to be chilled and rolled out for your pie.
Factors to consider when choosing the best stand mixer for pie crust
When choosing the best stand mixer for making pie crust, there are several factors to consider:
- Power: Choose a mixer with a powerful motor, preferably 325 watts or more, that can handle tough doughs and mixtures.
- Capacity: Consider the capacity of the mixer bowl, which should be able to hold enough dough for your pie crust recipe.
- Speed Settings: Look for a mixer with multiple speed settings, including a slow speed for mixing ingredients and a high speed for whipping cream.
- Attachments: Choose a mixer with a dough hook attachment for kneading dough and a paddle attachment for mixing ingredients. Some mixers also come with a whisk attachment for whipping cream and egg whites.
- Durability: Look for a mixer made with high-quality materials that will last for years.
- Brand and Model: Consider the brand and model of the mixer, and read reviews and ratings from other users to ensure that it is reliable and performs well for making pie crust.
What is the best stand mixer for pie crust?
When it comes to choosing a stand mixer for making pie crust, there are several factors to consider, such as power, speed options, bowl capacity, and attachments.
Some of the most popular stand mixers for making pie crust include:
- KitchenAid Artisan Series Stand Mixer: This is a classic stand mixer that is known for its powerful motor and versatile attachments. It comes with a flat beater, dough hook, and wire whip, which are all useful for making pie crust.
- Cuisinart SM-50BC Stand Mixer: This stand mixer is known for its powerful motor and large capacity bowl, which can hold up to 5.5 quarts. It comes with a flat mixing paddle, dough hook, and chef’s whisk, which are all useful for making pie crust.
- Hamilton Beach Eclectrics All-Metal Stand Mixer: This stand mixer is a more affordable option that still offers a powerful motor and several useful attachments, including a flat beater, dough hook, and wire whisk.
Ultimately, the best stand mixer for making pie crust will depend on your specific needs and budget. Consider the power of the motor, the bowl capacity, the attachments included, and the overall durability and quality of the machine when making your choice.
How to clean stand mixer for pie crust
Cleaning a stand mixer after making pie crust is an important step to maintain the machine and ensure it continues to function properly. Here are the steps to clean a stand mixer for pie crust:
- Unplug the mixer: Before cleaning your stand mixer, make sure it is unplugged to prevent any accidental injury.
- Remove attachments: Remove any attachments, such as the bowl, beater, and dough hook.
- Wash attachments: Wash the attachments in warm, soapy water, using a sponge or soft brush to remove any food particles. Rinse with clean water and dry thoroughly.
- Wipe down the mixer: Use a damp cloth to wipe down the mixer body and motor, being careful not to get water inside any electrical components.
- Clean the bowl: If the bowl is dishwasher safe, you can place it in the dishwasher. Otherwise, wash it in warm, soapy water, using a sponge or soft brush to remove any food particles. Rinse with clean water and dry thoroughly.
- Dry thoroughly: Make sure all parts are completely dry before storing the mixer.
It’s important to clean your stand mixer after every use, especially when making pie crust. This will prevent any leftover dough from hardening and becoming difficult to remove later on.
How to maintain stand mixer for pie crust properly
Maintaining your stand mixer properly is important to ensure it continues to work effectively and efficiently. Here are some tips for maintaining your stand mixer for making pie crust:
- Keep it clean: After each use, wipe down the mixer with a damp cloth to remove any food particles or debris. If the attachments are dishwasher safe, wash them in the dishwasher. Otherwise, wash them in warm, soapy water and dry them thoroughly.
- Store it properly: When not in use, store your stand mixer in a cool, dry place to prevent any moisture or dust from accumulating inside the machine.
- Check the attachments: Regularly inspect the attachments, such as the beaters and dough hook, for signs of wear or damage. Replace any worn or damaged parts promptly to ensure the mixer continues to work properly.
- Oil the moving parts: The moving parts of the stand mixer should be oiled periodically to keep them lubricated and running smoothly. Refer to the manufacturer’s instructions for the recommended type of oil and how often to oil the mixer.
- Use it properly: Follow the manufacturer’s instructions for using the stand mixer, including the recommended speed and attachment for different types of dough. Avoid overworking the dough, which can result in a tough crust.
By following these tips for maintaining your stand mixer, you can help ensure it lasts for many years and produces delicious pie crust every time.
What should one avoid when making a pie crust?
Here are some things to avoid when making a pie crust:
- Overworking the dough: Overworking the dough can lead to tough and dry pie crust. It’s important to handle the dough as little as possible.
- Using warm ingredients: Using warm ingredients can make the dough too soft and difficult to work with. It’s important to keep the butter and water cold when making pie crust.
- Rolling the dough too thin or thick: Rolling the dough too thin can make it difficult to handle and prone to tearing. Rolling the dough too thick can result in a dense and heavy crust.
- Not chilling the dough: Chilling the dough before rolling it out helps the gluten relax and prevents the dough from shrinking during baking.
- Adding too much flour: Adding too much flour can make the dough tough and dry. It’s important to add just enough flour to bring the dough together.
Conclusion
In conclusion, using a stand mixer can be a great tool for making pie crust, as it can save time and effort while producing a consistent and even dough. When choosing a stand mixer for making pie crust, consider factors such as power, speed options, bowl capacity, and attachments. Some of the most popular stand mixers for making pie crust include the KitchenAid Artisan Series Stand Mixer, the Cuisinart SM-50BC Stand Mixer, and the Hamilton Beach Eclectrics All-Metal Stand Mixer.
When kneading pie crust in a stand mixer, be careful not to overwork the dough, and aim for no more than 2-3 minutes of kneading. Proper maintenance of your stand mixer is also important to ensure it continues to work effectively and efficiently. By following these tips and recommendations, you can achieve perfect pie crust every time with your stand mixer.
Related Posts
Best Food Processor For Pie Crust
Pie crusts are one of the most important components of...
Read MoreBest Stand Mixer for Bread Dough
Baking bread from scratch can be a rewarding experience, but...
Read More Post Views: 1,275
Why Trust Us
You will find what you are looking for at Jody's Bakery. From classic to luxury brands, you'll find both. We will help you to select appliances that fit your needs, budget and lifestyle. Whether you want to stop by to learn more — or plan to make a major purchase — we’ll treat you like family and assist you every step of the way. Shop with us today to receive friendly and experienced help along the way.


… [Trackback]
[…] Read More Information here on that Topic: jodysbakery.com/how-to-make-pie-crust-in-a-stand-mixer/ […]
… [Trackback]
[…] Read More to that Topic: jodysbakery.com/how-to-make-pie-crust-in-a-stand-mixer/ […]
… [Trackback]
[…] Information on that Topic: jodysbakery.com/how-to-make-pie-crust-in-a-stand-mixer/ […]
… [Trackback]
[…] Info on that Topic: jodysbakery.com/how-to-make-pie-crust-in-a-stand-mixer/ […]
… [Trackback]
[…] Find More Info here to that Topic: jodysbakery.com/how-to-make-pie-crust-in-a-stand-mixer/ […]
… [Trackback]
[…] Here you will find 95149 more Info on that Topic: jodysbakery.com/how-to-make-pie-crust-in-a-stand-mixer/ […]
… [Trackback]
[…] Read More Information here on that Topic: jodysbakery.com/how-to-make-pie-crust-in-a-stand-mixer/ […]
… [Trackback]
[…] Read More on that Topic: jodysbakery.com/how-to-make-pie-crust-in-a-stand-mixer/ […]
… [Trackback]
[…] Read More Info here on that Topic: jodysbakery.com/how-to-make-pie-crust-in-a-stand-mixer/ […]
… [Trackback]
[…] Read More on on that Topic: jodysbakery.com/how-to-make-pie-crust-in-a-stand-mixer/ […]
… [Trackback]
[…] Find More here to that Topic: jodysbakery.com/how-to-make-pie-crust-in-a-stand-mixer/ […]
I seriously love your blog.. Great colors & theme. Did you develop this
web site yourself? Please reply back as I’m looking to create my own website
and want to learn where you got this from or what the theme is
called. Thanks!