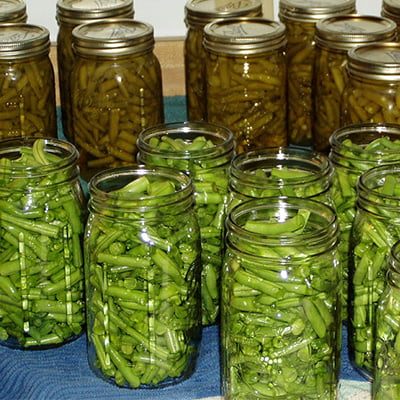
Pressure canning is a method of preserving vegetables by processing them in airtight containers at high temperatures and pressures. This process kills bacteria and other microorganisms that can cause spoilage, making the vegetables shelf-stable for an extended period of time.
Pressure canning is an effective and safe method for preserving low-acid vegetables like green beans, carrots, and corn. By pressure canning your vegetables, you can enjoy your homegrown or locally sourced produce all year round, even when they’re out of season. It’s important to follow proper pressure canning guidelines to ensure the safety and quality of your canned vegetables.
Why should you use a pressure canner for Pressure Canning Vegetables?
Using a pressure canner is essential for pressure canning vegetables because it allows for the safe and effective preservation of low-acid foods. Unlike high-acid foods like fruits and pickles, which can be safely preserved using a boiling water bath canner, low-acid foods like vegetables can harbor harmful bacteria, such as Clostridium botulinum, that can cause botulism if not properly processed.
A pressure canner creates the high temperatures and pressures needed to destroy these bacteria, ensuring the safety and shelf-stability of your canned vegetables. The heat and pressure penetrate the entire contents of the jar, including the center of the vegetables, ensuring that all bacteria are eliminated. This process also helps to retain the nutritional content and flavor of the vegetables, making them a healthy and tasty addition to your pantry.
It’s important to use a pressure canner that has been tested and approved by the USDA for pressure canning. This will ensure that you’re using a safe and reliable tool for preserving your vegetables.
How to make Pressure Canning Vegetables in a pressure canner
Here’s a step-by-step guide on how to pressure can vegetables using a pressure canner:
- Choose your vegetables: Select fresh, firm vegetables that are in season and free from blemishes or bruises. Good vegetables for pressure canning include green beans, carrots, beets, corn, and potatoes.
- Wash and prepare your vegetables: Wash your vegetables thoroughly and remove any stems, leaves, or roots. Cut your vegetables into small, uniform pieces.
- Prepare your jars and lids: Wash your canning jars, lids, and rings in hot soapy water and rinse well. Sterilize your jars and lids by boiling them in water for 10 minutes. Keep your jars and lids hot until ready to use.
- Pack your jars with vegetables: Pack your vegetables tightly into your hot, sterilized jars, leaving 1 inch of headspace at the top. Add a 1/2 teaspoon of salt to each jar (optional).
- Add hot water or vegetable broth: Cover your vegetables with boiling water or vegetable broth, leaving 1 inch of headspace at the top. Remove any air bubbles by gently tapping the jar on a towel and adding more liquid if necessary.
- Wipe the jar rims and apply lids and rings: Wipe the rims of your jars with a clean, damp cloth to remove any food particles. Place your lids on the jars and screw on the rings until finger tight.
- Load your pressure canner: Add 3 inches of hot water to your pressure canner and place your jars in the canner using a jar lifter. Follow the instructions for your specific pressure canner to ensure proper loading.
- Vent your canner: Place the lid on your pressure canner and turn the heat to high. Allow steam to escape from the vent for 10 minutes or as directed by your canner’s instructions.
- Build pressure: Close the vent and allow your pressure canner to build pressure according to your recipe’s instructions. This typically requires bringing the pressure to 10-11 pounds for most vegetables.
- Process your jars: Process your jars at the recommended pressure and time for your specific recipe and elevation. Follow the recipe instructions closely, adjusting for altitude if necessary.
- Remove jars from canner: Once the processing time is complete, turn off the heat and allow the canner to cool and depressurize. Use a jar lifter to remove your jars from the canner and place them on a towel-lined countertop.
- Check your seals: Allow your jars to cool for 12-24 hours, then check the seals by pressing down on the center of each lid. If the lid is firm and does not flex, your seal is good. If the lid pops up and down, your seal has failed and the jar should be refrigerated and used within a few days.
- Store your jars: Label your jars with the date and contents and store in a cool, dark place for up to one year.
Tips for making Pressure Canning Vegetables in a pressure canner
Here are some tips to keep in mind when pressure canning vegetables:
- Always use a pressure canner: It’s important to use a pressure canner, not a water bath canner, when canning vegetables. Vegetables are low-acid foods, and pressure canning is necessary to kill harmful bacteria and prevent spoilage.
- Follow a tested recipe: Use a tested recipe from a reputable source, such as the National Center for Home Food Preservation or a trusted canning cookbook. Follow the recipe exactly, including processing time and pressure, to ensure that your vegetables are safe to eat.
- Use high-quality vegetables: Choose fresh, firm vegetables that are in season and free from blemishes or bruises. Avoid overripe or soft vegetables, as they may not can well.
- Cut vegetables into uniform pieces: Cut your vegetables into small, uniform pieces to ensure that they cook evenly and pack well in your jars.
- Leave proper headspace: Leave the recommended amount of headspace in your jars to allow for expansion during processing and to ensure a proper seal. Typically, you should leave 1 inch of headspace for vegetables.
- Remove air bubbles: Use a plastic or silicone spatula to remove any air bubbles from your jars before processing. This helps ensure that the vegetables are packed tightly and reduces the risk of spoilage.
- Wipe jar rims: Wipe the rims of your jars with a clean, damp cloth before applying lids and rings. This helps ensure a good seal and reduces the risk of contamination.
- Process at the correct pressure and time: Follow the processing time and pressure recommendations for your specific recipe and elevation. Check your pressure canner’s instructions to ensure you are using the correct settings.
- Allow jars to cool naturally: After processing, turn off the heat and allow the pressure canner to cool and depressurize naturally. Do not try to speed up the cooling process by placing the canner in cold water or opening the vent.
- Check seals and store properly: After cooling, check the seals on your jars and store in a cool, dark place. Use any jars with failed seals within a few days and store the rest for up to one year.
Related Posts
Why Trust Us
You will find what you are looking for at Jody's Bakery. From classic to luxury brands, you'll find both. We will help you to select appliances that fit your needs, budget and lifestyle. Whether you want to stop by to learn more — or plan to make a major purchase — we’ll treat you like family and assist you every step of the way. Shop with us today to receive friendly and experienced help along the way.


… [Trackback]
[…] Here you can find 53411 more Info on that Topic: jodysbakery.com/pressure-canning-vegetables/ […]
… [Trackback]
[…] There you can find 70847 more Information to that Topic: jodysbakery.com/pressure-canning-vegetables/ […]
… [Trackback]
[…] Here you will find 90768 more Information to that Topic: jodysbakery.com/pressure-canning-vegetables/ […]
… [Trackback]
[…] Info on that Topic: jodysbakery.com/pressure-canning-vegetables/ […]
… [Trackback]
[…] Information to that Topic: jodysbakery.com/pressure-canning-vegetables/ […]
… [Trackback]
[…] Here you can find 23714 more Info on that Topic: jodysbakery.com/pressure-canning-vegetables/ […]
… [Trackback]
[…] Find More Information here on that Topic: jodysbakery.com/pressure-canning-vegetables/ […]
… [Trackback]
[…] Read More on to that Topic: jodysbakery.com/pressure-canning-vegetables/ […]
… [Trackback]
[…] Find More here to that Topic: jodysbakery.com/pressure-canning-vegetables/ […]
… [Trackback]
[…] Read More to that Topic: jodysbakery.com/pressure-canning-vegetables/ […]
… [Trackback]
[…] Read More on that Topic: jodysbakery.com/pressure-canning-vegetables/ […]