Pesto is one of the culinary delights I discovered far...
Read More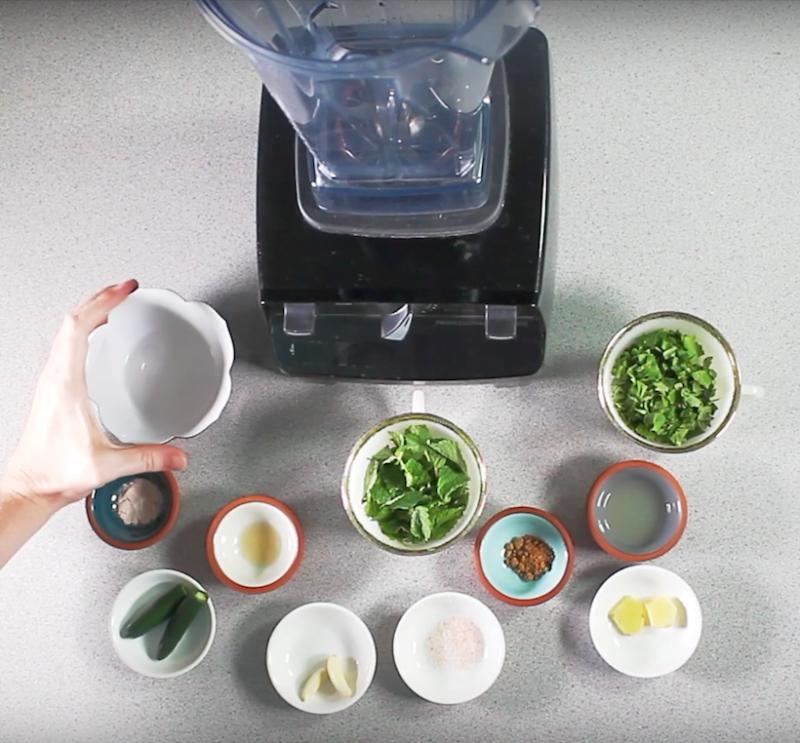
Chutney is a flavorful condiment that originated in the Indian subcontinent. It is made by blending various ingredients such as fruits, vegetables, herbs, spices, and vinegar or lemon juice to create a thick and chunky sauce. Chutneys can be sweet, spicy, or tangy, and they add a burst of flavor to a wide range of dishes.
Blenders are a popular tool for making chutney as they efficiently combine and puree the ingredients, resulting in a smooth and well-incorporated texture. Whether you’re using a traditional countertop blender or a handheld immersion blender, the powerful blades make quick work of chopping and blending the ingredients together.
Using a blender for chutney offers several advantages. Firstly, it saves time and effort compared to manually chopping and mixing ingredients. The blender’s sharp blades ensure even and consistent blending, resulting in a well-balanced chutney with a harmonious blend of flavors. Additionally, blenders allow you to adjust the texture of the chutney to your liking by controlling the blending time. You can create a smooth and silky chutney or leave it slightly chunky for added texture.
Blenders also provide versatility when making chutney. You can experiment with different combinations of fruits, vegetables, herbs, and spices to create unique flavor profiles. Blending also helps release the essential oils and flavors from the ingredients, enhancing the overall taste of the chutney.
In summary, using a blender to make chutney is a convenient and efficient way to create flavorful condiments. It allows you to blend and combine ingredients easily, resulting in delicious and versatile chutneys that can complement a variety of dishes.
Is homemade chutney healthy?
Homemade chutney can be a healthy addition to your diet when prepared with nutritious ingredients and consumed in moderation. Here are some reasons why homemade chutney can be a healthy choice:
- Nutrient-Dense Ingredients: Chutneys often contain a variety of fruits, vegetables, herbs, and spices, which can provide a range of essential nutrients, vitamins, and minerals. For example, chutneys made with ingredients like tomatoes, onions, garlic, ginger, and herbs can contribute to your overall nutrient intake.
- Fiber Content: Many chutneys contain fiber-rich ingredients such as fruits, vegetables, and herbs. Fiber is important for digestive health, helps regulate blood sugar levels, and promotes feelings of fullness.
- Antioxidant-Rich: Chutneys often include ingredients like herbs, spices, and fruits that are rich in antioxidants. These compounds help protect your cells from damage caused by harmful free radicals and have potential health benefits.
- Reduced Fat and Sugar: Homemade chutney allows you to control the ingredients and adjust the levels of fat and sugar. You can minimize the use of added fats and sweeteners, making it a healthier option compared to some store-bought chutneys that may contain high amounts of unhealthy fats or added sugars.
- Flavorful Alternative: Chutneys can add flavor to meals without the need for excessive amounts of salt, sugar, or unhealthy sauces. By incorporating chutneys into your meals, you can enhance taste and satisfaction without compromising your health goals.
However, it’s important to note that the overall healthiness of chutney depends on the specific recipe and ingredients used. Some chutneys may have higher sugar or salt content, while others may be low in nutrients if they are primarily made with added sugars or unhealthy fats. It’s advisable to choose homemade chutneys that prioritize whole, unprocessed ingredients and use minimal amounts of added fats and sugars.
Additionally, portion control is key. While chutney can be a healthy addition to your meals, it’s important to consume it in moderation as part of a balanced diet.
What equipment is used to make chutney?
To make chutney, you will typically need the following equipment:
- Blender or Food Processor: A blender or food processor is used to blend the ingredients together to create a smooth or chunky texture, depending on your preference.
- Cutting Board and Knife: These are essential for chopping and preparing the fruits, vegetables, and herbs that go into the chutney.
- Saucepan or Cooking Pot: You’ll need a saucepan or cooking pot to cook the chutney mixture on the stovetop. Make sure the pot is large enough to accommodate the ingredients and allow for simmering.
- Wooden Spoon or Spatula: These utensils are used for stirring and mixing the chutney while it cooks to prevent sticking or burning.
- Jars or Containers: If you plan to store the chutney for later use, you’ll need clean, sterilized jars or containers with airtight lids. Glass jars are commonly used for canning chutney.
- Canning Equipment (optional): If you want to preserve the chutney for longer shelf life, you may also need additional canning equipment such as jar tongs, a jar lifter, a canning funnel, and a boiling water bath canner.
- Measuring Cups and Spoons: These are used to accurately measure the ingredients for the chutney recipe.
- Spices and Seasonings: Depending on the recipe, you may also need a spice grinder or mortar and pestle to grind whole spices, such as cumin seeds or peppercorns.
It’s important to note that specific equipment needs may vary depending on the recipe and personal preferences. Always refer to the recipe instructions for any specific equipment requirements or recommendations.
Can you make chutney in blender?
Yes, you can make chutney in a blender. In fact, using a blender is a convenient and efficient way to make chutney. The powerful blades of the blender help in chopping and blending the ingredients together, resulting in a smooth and well-incorporated texture.
To make chutney in a blender, you’ll need to gather the ingredients for your desired chutney recipe. This can include fruits, vegetables, herbs, spices, and any other flavorings you prefer. Simply add the ingredients to the blender, starting with the softer ingredients at the bottom, and blend until you achieve the desired consistency.
Depending on the type of chutney you’re making, you may need to adjust the blending time. If you prefer a smooth and silky texture, blend for a longer time until all the ingredients are well combined. For a chunkier texture, blend for a shorter time, leaving some small pieces of ingredients intact.
It’s also important to note that some chutney recipes may require cooking or sautéing certain ingredients before blending. This helps develop the flavors and ensures that the chutney is properly cooked and safe to consume. Once you’ve blended the ingredients to your desired consistency, transfer the chutney to a jar or container, and store it in the refrigerator for later use.
Overall, making chutney in a blender is a quick and efficient method that allows you to create flavorful condiments with ease. It’s a versatile tool that can help you achieve the desired texture and consistency for your chutney, whether you prefer it smooth or chunky.
What is the production process of chutney?
The production process of chutney involves several steps, which may vary depending on the specific recipe and ingredients used. Here is a general overview of the production process:
- Ingredient Preparation: Gather all the ingredients required for your chutney recipe. This can include fruits, vegetables, herbs, spices, and flavorings. Wash, peel, and chop the ingredients into small, uniform pieces. Remove any seeds, pits, or tough stems as needed.
- Cooking or Sautéing: In some chutney recipes, certain ingredients may need to be cooked or sautéed before blending. This step helps soften the ingredients, develop flavors, and ensure the chutney is properly cooked. Follow the recipe instructions for the specific cooking method and duration.
- Blending: Once the ingredients are prepared, transfer them to a blender or food processor. Blend the ingredients on low speed initially to break them down, gradually increasing the speed to achieve the desired consistency. Blend until the chutney reaches a smooth or chunky texture, depending on your preference.
- Adjusting Consistency and Seasonings: Check the consistency of the chutney. If it’s too thick, you can add a small amount of liquid, such as water, lemon juice, or vinegar, to achieve the desired consistency. Taste the chutney and adjust the seasonings, such as salt, sugar, or spices, to balance the flavors according to your preference.
- Cooling and Melding Flavors: Allow the chutney to cool to room temperature. This allows the flavors to meld together and develop further. You can leave the chutney at room temperature for a short period or transfer it to a clean jar or container and refrigerate it for a few hours or overnight.
- Storing: Once the chutney has cooled and the flavors have melded, transfer it to clean, airtight jars or containers. Store the chutney in the refrigerator to maintain its freshness and flavor. Chutney can typically be stored in the refrigerator for up to a week, but it’s best to check the recipe or use your judgment based on the specific ingredients used.
- It’s important to note that the production process may vary depending on the recipe and personal preferences. Different chutney recipes may have additional steps or variations, so it’s always recommended to follow a specific recipe for the best results.
What raw materials are in chutney?
Chutney is a versatile condiment that can be made with various combinations of ingredients. The specific raw materials used in chutney can vary depending on the type of chutney and regional preferences. However, some common raw materials found in chutney include:
- Fruits: Fruits like mango, apple, pineapple, tomato, and cranberries are commonly used in chutney to provide a sweet and tangy flavor.
- Vegetables: Onions, garlic, ginger, and chili peppers are often included to add depth and spiciness to the chutney.
- Herbs and Spices: Chutney typically contains a blend of herbs and spices for flavoring. Common ones include coriander, cumin, turmeric, mustard seeds, cinnamon, cloves, and cardamom.
- Vinegar or Lemon Juice: These acidic ingredients are used to enhance the flavor and provide a tangy element to the chutney.
- Sugar or Sweeteners: Chutney often incorporates a sweet element to balance the flavors. Sugar, brown sugar, honey, or jaggery (unrefined cane sugar) are commonly used.
- Salt: A small amount of salt is added to balance the flavors and enhance the overall taste.
It’s important to note that these ingredients can vary depending on the specific recipe and regional variations. Chutney recipes offer a lot of flexibility, allowing you to customize the flavors based on your preferences.
What's the difference between a sauce and a chutney?
The terms “sauce” and “chutney” are often used interchangeably, and the distinction between them can vary based on culinary traditions and regional preferences. However, there are some general differences that can help differentiate between the two:
Consistency: In general, sauces have a thinner and smoother consistency compared to chutneys. Sauces are often liquid or semi-liquid, while chutneys tend to be thicker and chunkier.
Ingredients: Sauces can be made from a wide range of ingredients, including vegetables, fruits, herbs, spices, and various liquid bases. Chutneys, on the other hand, typically contain a combination of fruits, vegetables, herbs, spices, and acidic elements like vinegar or lemon juice.
Flavor Profiles: Sauces are often used to enhance or complement the flavors of a dish. They can be savory, sweet, tangy, or spicy, depending on the intended purpose. Chutneys, on the other hand, are known for their unique combination of sweet, tangy, and spicy flavors. They are often used as condiments to add a burst of flavor to a dish.
Cultural Context: The distinction between sauces and chutneys can also be influenced by cultural context. For example, in Western cuisines, sauces are more commonly associated with dishes like pasta or meat, while chutneys are often associated with Indian or South Asian cuisine, where they are used as accompaniments to meals or snacks.
It’s important to note that these differences are not strict rules, and there can be variations and overlaps between sauces and chutneys. The terms can be used differently in different culinary traditions and personal interpretations. Ultimately, the distinction between a sauce and a chutney may depend on the specific recipe, ingredients, and culinary context.
What's the difference between jam and chutney?
Jam and chutney are both types of condiments that are made from fruits, but there are some key differences between them:
Ingredients: Jam is primarily made from fruit, sugar, and sometimes pectin, which helps thicken the mixture. Chutney, on the other hand, typically includes a combination of fruits, vegetables, spices, vinegar, sugar, and sometimes other flavorings like herbs or ginger. Chutneys often have a more complex flavor profile due to the combination of ingredients.
Consistency: Jam has a thick, smooth, and spreadable consistency. It is typically cooked until the fruits break down and thicken into a gel-like texture. Chutney, on the other hand, has a chunkier and more textured consistency. It contains small pieces or chunks of fruits and vegetables that are cooked down but not completely pureed, resulting in a more textured condiment.
Flavor Profile: Jam is generally sweet with the natural flavor of the fruit being the predominant taste. It is usually enjoyed as a sweet spread for bread, pastries, or desserts. Chutney, on the other hand, has a more complex flavor profile that combines sweet, tangy, and spicy elements. It often incorporates a variety of spices and may have a savory or tangy flavor profile. Chutneys are commonly used as condiments to accompany savory dishes, such as curries, rice, or grilled meats.
Usage: Jam is typically used as a sweet spread for toast, bread, scones, or other baked goods. It can also be used as a filling for cakes or pastries. Chutney, on the other hand, is used as a condiment or relish to accompany savory dishes. It adds a burst of flavor to meats, cheeses, sandwiches, rice, or other main dishes.
Overall, the main differences between jam and chutney lie in their ingredients, consistency, flavor profile, and usage. While both are delicious ways to preserve and enjoy fruits, jam is primarily sweet and smooth, while chutney is more complex, textured, and often savory or tangy.
Benefits of making chutney in blender
Making chutney in a blender offers several benefits:
- Convenience: Using a blender for making chutney is convenient and time-saving. It allows you to quickly blend the ingredients together without much effort or manual chopping.
- Smooth Texture: Blending the ingredients in a blender helps create a smooth and consistent texture for the chutney. It helps break down the ingredients into fine particles, resulting in a well-incorporated mixture.
- Easy Customization: With a blender, you can easily customize the consistency of your chutney. If you prefer a chunkier texture, you can pulse the blender for shorter durations. For a smoother consistency, blend the ingredients for longer.
- Efficient Mixing: Blending in a blender ensures that all the ingredients are thoroughly mixed and evenly distributed. This helps in achieving a well-balanced flavor throughout the chutney.
- Time-Saving: Using a blender for making chutney can save you time compared to manual chopping and grinding. It helps you achieve the desired consistency and blend the ingredients quickly.
- Versatility: Blenders are versatile kitchen appliances that can be used for various other culinary tasks. Apart from making chutney, you can use the blender for making sauces, dressings, smoothies, purees, and more.
Overall, using a blender to make chutney offers convenience, efficient mixing, customization options, and time-saving benefits. It can help you achieve a smooth and well-blended chutney with minimum effort.
How to make chutney in blender
To make chutney in a blender, follow these general steps:
- Gather the ingredients: Choose the ingredients for your chutney recipe. This can include fruits, vegetables, herbs, spices, and any other flavorings you prefer.
- Prepare the ingredients: Wash and chop the ingredients into small pieces for easy blending. Remove any seeds, pits, or tough stems as needed.
- Add ingredients to the blender: Place the chopped ingredients into the blender jar. Start with the softer ingredients at the bottom and layer the rest on top.
- Blend on low speed: Start blending on a low speed to begin breaking down the ingredients. Gradually increase the speed to achieve a smooth consistency. You may need to stop the blender occasionally to scrape down the sides and ensure all ingredients are blended evenly.
- Adjust consistency and seasonings: Check the consistency of the chutney and add more liquid (such as water, lemon juice, or vinegar) if it’s too thick. Taste the chutney and adjust the seasonings (salt, sugar, spices) according to your preference.
- Blend to desired texture: Continue blending until you achieve the desired texture. If you prefer a smooth chutney, blend for a longer time. For a chunkier chutney, blend for a shorter time, leaving some small pieces of ingredients intact.
- Optional: Cook or sauté ingredients: Some chutney recipes require cooking or sautéing certain ingredients before blending. This step helps develop flavors and ensures the chutney is properly cooked. Follow the recipe instructions if cooking is needed.
- Transfer and store: Once blended, transfer the chutney to a clean jar or container. Store it in the refrigerator for a few hours to allow the flavors to meld together. Chutney can typically be stored in the refrigerator for up to a week.
Remember to refer to specific chutney recipes for ingredient quantities and any additional steps or variations. Enjoy your homemade chutney with various dishes, snacks, or as a condiment!
How long do you process chutney in blender?
The processing time for chutney in a blender can vary depending on the desired texture and the specific recipe you are following. Generally, the chutney is blended until it reaches a smooth or slightly chunky consistency, depending on your preference.
The processing time can range from a few seconds to a couple of minutes, depending on the ingredients and the power of your blender. Start by blending on low speed to break down the ingredients, and then gradually increase the speed as needed. Stop blending periodically to check the texture and adjust the processing time accordingly.
It’s important to note that over-blending can result in a very smooth or watery consistency, while under-blending may leave the chutney with larger chunks. The goal is to achieve a texture that is pleasing to you and complements the ingredients in the chutney.
Therefore, it’s best to monitor the blending process and stop when you are satisfied with the texture. Remember, you can always blend for a shorter time initially and then blend longer if needed, but it’s more difficult to correct an over-blended chutney.
Additionally, some chutney recipes may call for specific processing times or instructions, so it’s advisable to follow the recipe guidelines for the best results.
How thick should chutney be before bottling?
The thickness of chutney before bottling can vary depending on personal preference and the specific recipe you are using. Some people prefer a thicker chutney with more texture, while others prefer a smoother and thinner consistency. Ultimately, the thickness of the chutney can be adjusted to suit your taste.
When determining the thickness, consider the purpose of the chutney. If you’re using it as a spread or dip, a slightly thicker consistency may be desirable. On the other hand, if you’re using it as a condiment or sauce, a thinner consistency may be more appropriate.
As you cook the chutney, it will naturally thicken due to the reduction of liquid and the concentration of flavors. It’s a good idea to cook the chutney until it reaches a point where it coats the back of a spoon or achieves the desired consistency. This can be tested by running your finger along the back of the spoon and seeing if the chutney leaves a distinct trail without running off too quickly.
If the chutney is too thick for your liking, you can adjust the consistency by adding a small amount of liquid, such as water, vinegar, or citrus juice, and mixing it in until you achieve the desired thickness. Similarly, if the chutney is too thin, you can continue cooking it to evaporate more liquid and thicken it further.
Remember that chutney can continue to thicken as it cools, so keep that in mind when assessing the consistency. If you find that the chutney is too thick after it has cooled, you can add a small amount of liquid and mix it well before bottling.
Overall, the thickness of chutney before bottling is a matter of personal preference and can be adjusted to suit your taste and the intended use of the chutney.
How to jar homemade chutney?
To jar homemade chutney, follow these steps:
- Sterilize the jars: Wash the jars and lids thoroughly with hot soapy water. Rinse them well and place them in a large pot filled with water. Bring the water to a boil and let the jars boil for about 10 minutes. Remove them from the boiling water and let them air dry or place them upside down on a clean towel.
- Prepare the chutney: Cook your chutney according to the recipe and ensure it reaches the desired consistency. Keep the chutney hot while you prepare the jars.
- Fill the jars: Carefully ladle the hot chutney into the sterilized jars, leaving a small headspace at the top. Use a funnel if needed to prevent spills and ensure the rims of the jars remain clean.
- Remove air bubbles: Gently tap the jars on the countertop to remove any trapped air bubbles. You can also run a sterilized knife or a wooden skewer along the sides of the jar to release any air bubbles.
- Seal the jars: Wipe the rims of the jars with a clean, damp cloth to remove any spills or residue. Place the lids on the jars and tighten them securely. Be careful not to overtighten.
- Process the jars (optional): If you plan to store the chutney for an extended period or want to create a vacuum seal, you can process the jars in a boiling water bath. Place the filled jars back into the large pot of boiling water and ensure they are fully submerged. Process the jars for the recommended time based on your altitude and the size of the jars. Refer to canning guidelines for specific processing times.
- Cool and store: Once processed (or if not processing), carefully remove the jars from the pot using jar tongs or a jar lifter. Place them on a clean, dry towel or a wire rack to cool completely. As the jars cool, you may hear a popping sound, indicating that the lids have sealed properly. Let the chutney sit undisturbed for 24 hours to ensure a proper seal. Label the jars with the date and store them in a cool, dark place.
It’s important to note that proper canning techniques and safety guidelines should be followed when jarring chutney or any other homemade preserve. If you’re new to canning, it’s recommended to consult reliable canning resources or guides to ensure you’re following the correct procedures for safe preservation.
How do you make chutney last longer?
To make chutney last longer, you can follow these tips:
- Proper Sterilization: Ensure that the jars or containers used for storing the chutney are thoroughly cleaned and sterilized. This helps prevent the growth of bacteria or molds that can spoil the chutney.
- Hot Filling: When transferring the chutney into jars, make sure the chutney is hot. This helps create a seal and prevents air from entering the jar, which can cause spoilage. Seal the jars tightly immediately after filling.
- Refrigeration: Store the chutney in the refrigerator to keep it fresh for a longer duration. The cool temperature helps inhibit bacterial growth and extends the shelf life of the chutney. Keep the chutney in an airtight container in the refrigerator.
- Avoid Cross-Contamination: Always use clean utensils or spoons to scoop out the chutney from the jar. Avoid dipping dirty or wet utensils into the chutney, as it can introduce contaminants and reduce its shelf life.
- Proper Handling: Use clean and dry hands when handling the chutney. Moisture can promote bacterial growth, so it’s important to keep the chutney and its container dry.
- Avoid Double-Dipping: To prevent contamination, avoid double-dipping utensils or fingers into the chutney jar. Use a clean spoon or knife each time you take out the desired amount.
- Store in Small Portions: If you have a large batch of chutney, consider dividing it into smaller portions and storing them separately. This way, you can open and use one jar at a time, reducing the exposure of the remaining chutney to air and contaminants.
- Check for Spoilage: Regularly inspect the chutney for any signs of spoilage, such as mold growth, off smells, or unusual texture. If you notice any changes, discard the chutney to avoid the risk of foodborne illnesses.
By following these guidelines, you can help extend the shelf life of your chutney and enjoy it for a longer duration. However, it’s important to note that homemade chutneys may not have the same shelf life as commercially processed ones, so it’s advisable to consume them within a reasonable time frame.
Troubleshooting about making chutney in blender
When making chutney in a blender, you may encounter some common issues. Here are a few troubleshooting tips to help you overcome them:
- Texture too coarse or chunky: If your chutney has a coarse or chunky texture and you prefer it smoother, you can try blending it for a longer duration or pulsing it in short bursts to achieve the desired consistency. You can also add a little liquid, such as water or lemon juice, to help facilitate blending.
- Too watery or thin: If your chutney turns out too watery or thin, you can try adding more ingredients to thicken it. This can include additional fruits, vegetables, or cooked lentils. You can also simmer the chutney in a pan on low heat to reduce excess moisture and thicken it.
- Over-blending or pureeing: Be cautious not to over-blend or puree the chutney excessively. Over-blending can result in a loss of texture and make the chutney too smooth. It’s best to pulse the blender and check the consistency frequently to avoid over-processing.
- Unbalanced flavors: If your chutney tastes too sour, you can balance it by adding a small amount of sweetener like honey, sugar, or jaggery. On the other hand, if it’s too sweet, you can add some lemon juice or vinegar to enhance the tanginess.
- Adjusting seasoning: Taste your chutney after blending and adjust the seasoning as needed. You can add more salt, spices, herbs, or any other seasonings to achieve the desired flavor profile.
Remember, troubleshooting can be a subjective process, and adjustments may vary based on personal preferences and the specific recipe. It’s always a good idea to taste and adjust the chutney to suit your taste buds.
Conclusion
In conclusion, making chutney in a blender offers several advantages. It allows for quick and efficient preparation, ensuring a smooth and consistent texture. The blender’s powerful blades help break down the ingredients and blend them together, resulting in a flavorful chutney. Additionally, using a blender simplifies the process and reduces the effort required compared to traditional methods.
However, it’s important to pay attention to the desired texture and flavors, making necessary adjustments during the blending process. With proper troubleshooting and adjustments, you can create delicious chutneys to enhance your meals and snacks.
Related Posts
How To Make Tomato Sauce From Fresh Tomatoes
In the past I have made a little tomato sauce...
Read More
How To Make BBQ Sauce In A Blender: Detailed Guide & Extra Tips
There is no need to purchase barbecue sauce from a...
Read More Post Views: 1,637
Why Trust Us
You will find what you are looking for at Jody's Bakery. From classic to luxury brands, you'll find both. We will help you to select appliances that fit your needs, budget and lifestyle. Whether you want to stop by to learn more — or plan to make a major purchase — we’ll treat you like family and assist you every step of the way. Shop with us today to receive friendly and experienced help along the way.


I enjoyed reading this article. Its thought-provoking and well-presented. Lets discuss this further. Click on my nickname!
… [Trackback]
[…] Read More on on that Topic: jodysbakery.com/how-to-make-chutney-in-blender/ […]
… [Trackback]
[…] Information to that Topic: jodysbakery.com/how-to-make-chutney-in-blender/ […]
… [Trackback]
[…] Read More to that Topic: jodysbakery.com/how-to-make-chutney-in-blender/ […]
… [Trackback]
[…] Find More on that Topic: jodysbakery.com/how-to-make-chutney-in-blender/ […]
… [Trackback]
[…] Information on that Topic: jodysbakery.com/how-to-make-chutney-in-blender/ […]
… [Trackback]
[…] Read More on that Topic: jodysbakery.com/how-to-make-chutney-in-blender/ […]
… [Trackback]
[…] There you can find 99463 more Info on that Topic: jodysbakery.com/how-to-make-chutney-in-blender/ […]
… [Trackback]
[…] Information on that Topic: jodysbakery.com/how-to-make-chutney-in-blender/ […]
… [Trackback]
[…] Read More on on that Topic: jodysbakery.com/how-to-make-chutney-in-blender/ […]
… [Trackback]
[…] Here you can find 29164 more Info to that Topic: jodysbakery.com/how-to-make-chutney-in-blender/ […]
… [Trackback]
[…] Here you can find 95104 more Info on that Topic: jodysbakery.com/how-to-make-chutney-in-blender/ […]